ITCH 1 Application Manual
Installing the ITCH Application
Prerequisites
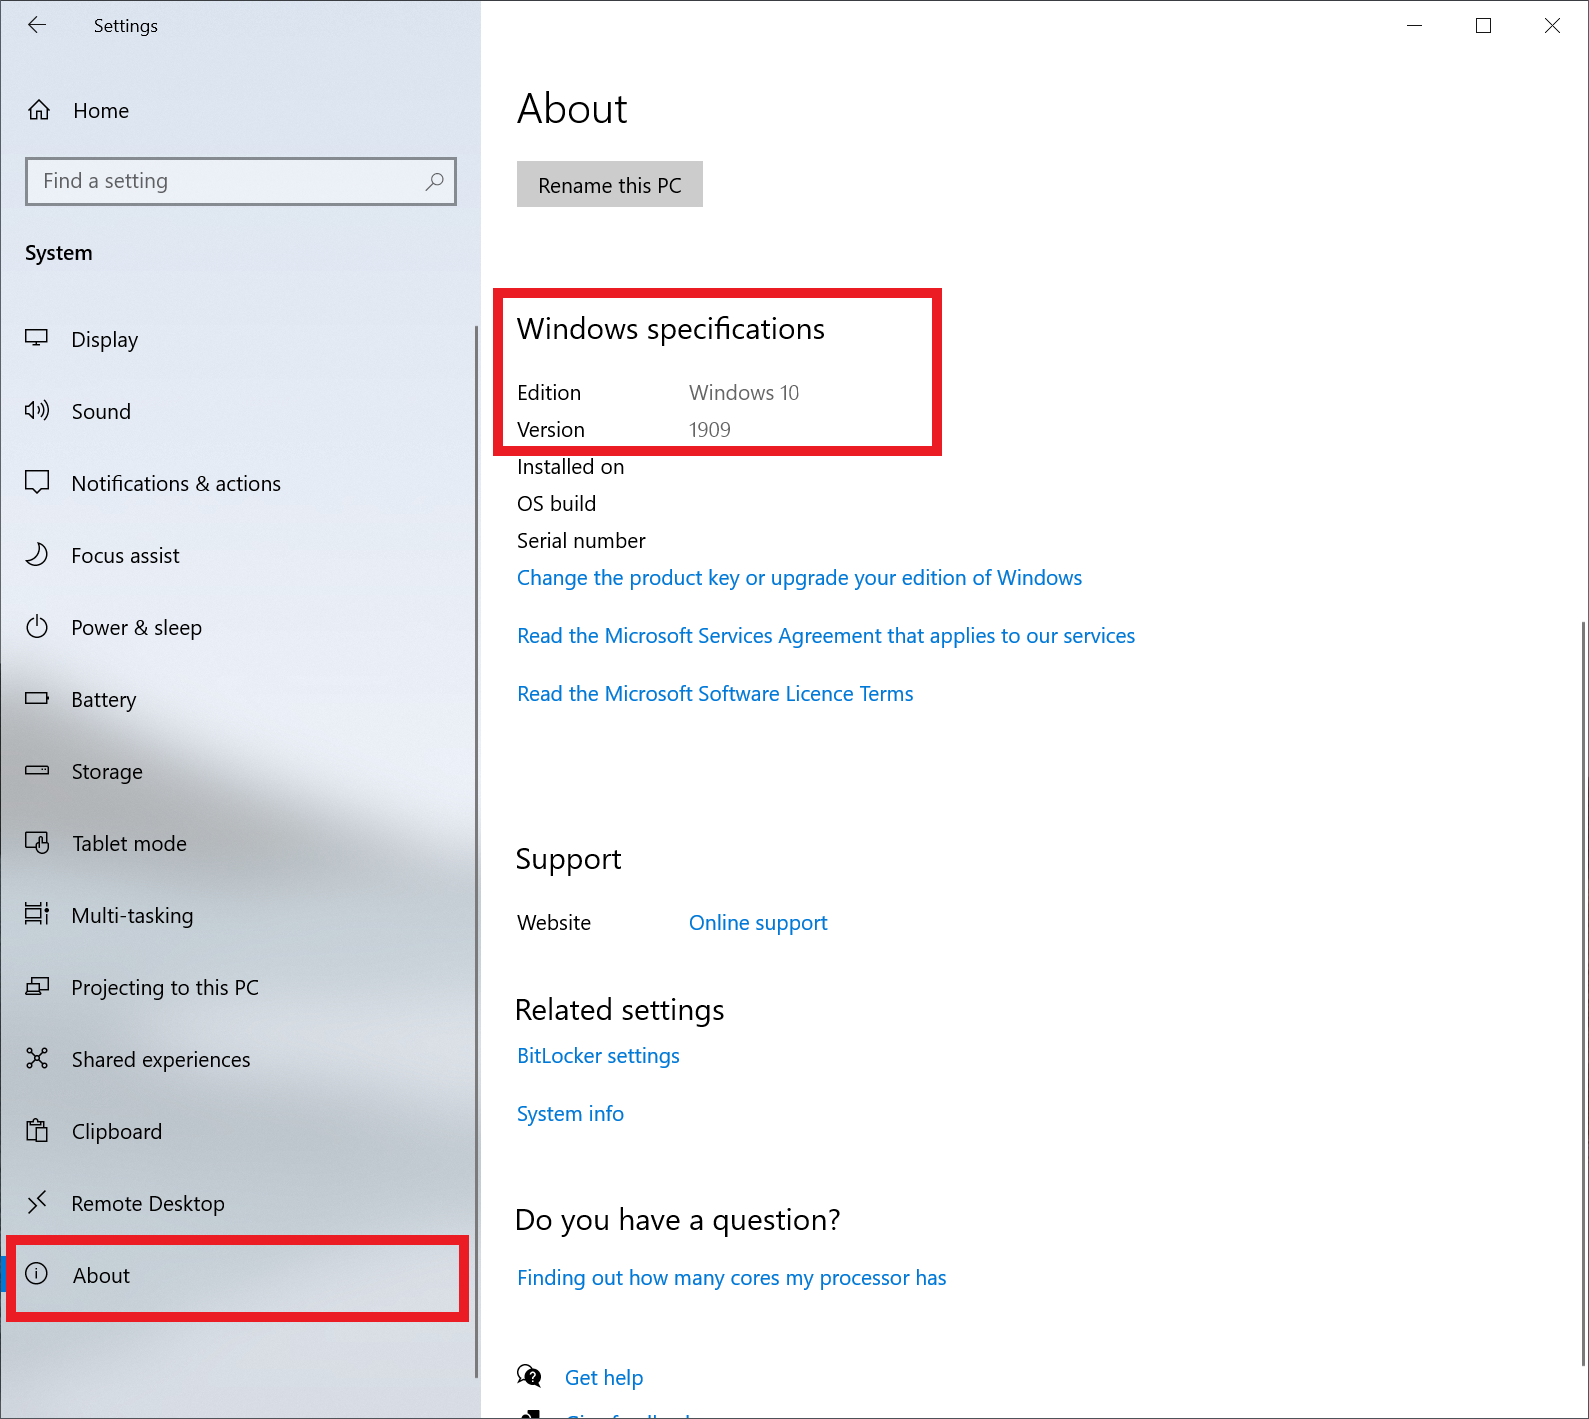
Check Windows Version
The ITCH Application requires Windows 10, version 1709 or later .
The image below shows where you can check your windows version within your computer settings.
Settings -> System -> About
Enable Sideloading
Sideloading must be enabled to install the application. Once the application is installed, you can change it back to its previous setting if desired.
You can check if sideloading is enabled by going to the following page within your computer settings:
Settings -> Update & Security -> For Developers

Download the installation package
The installation files for the latest version of the ITCH Application can be found here
Installing the Application
.Appxbundle / .Appx / .msixbundle approach
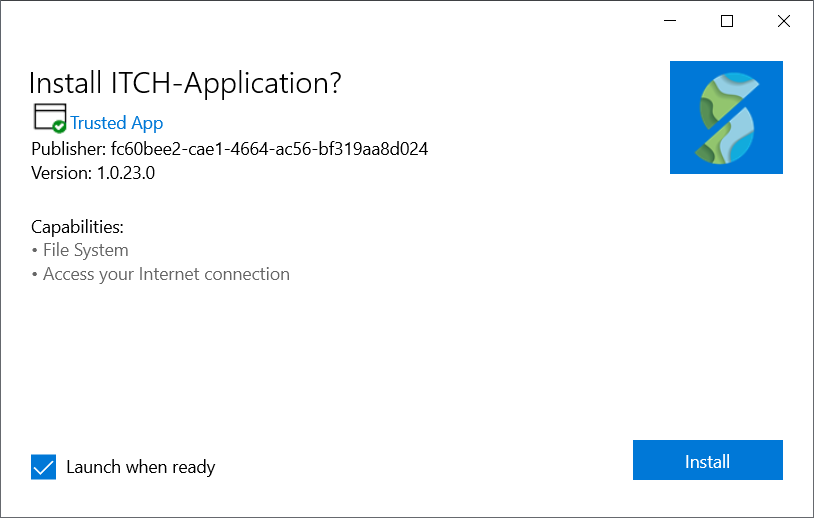
Double click the downloaded ITCH-Application-vX.X.appxbundle or .appx or .msixbundle file and click install. The application should automatically launch when the installation is complete.
What should I do if I'm not able to open the downloaded .appxbundle or .appx or .msixbundle file?
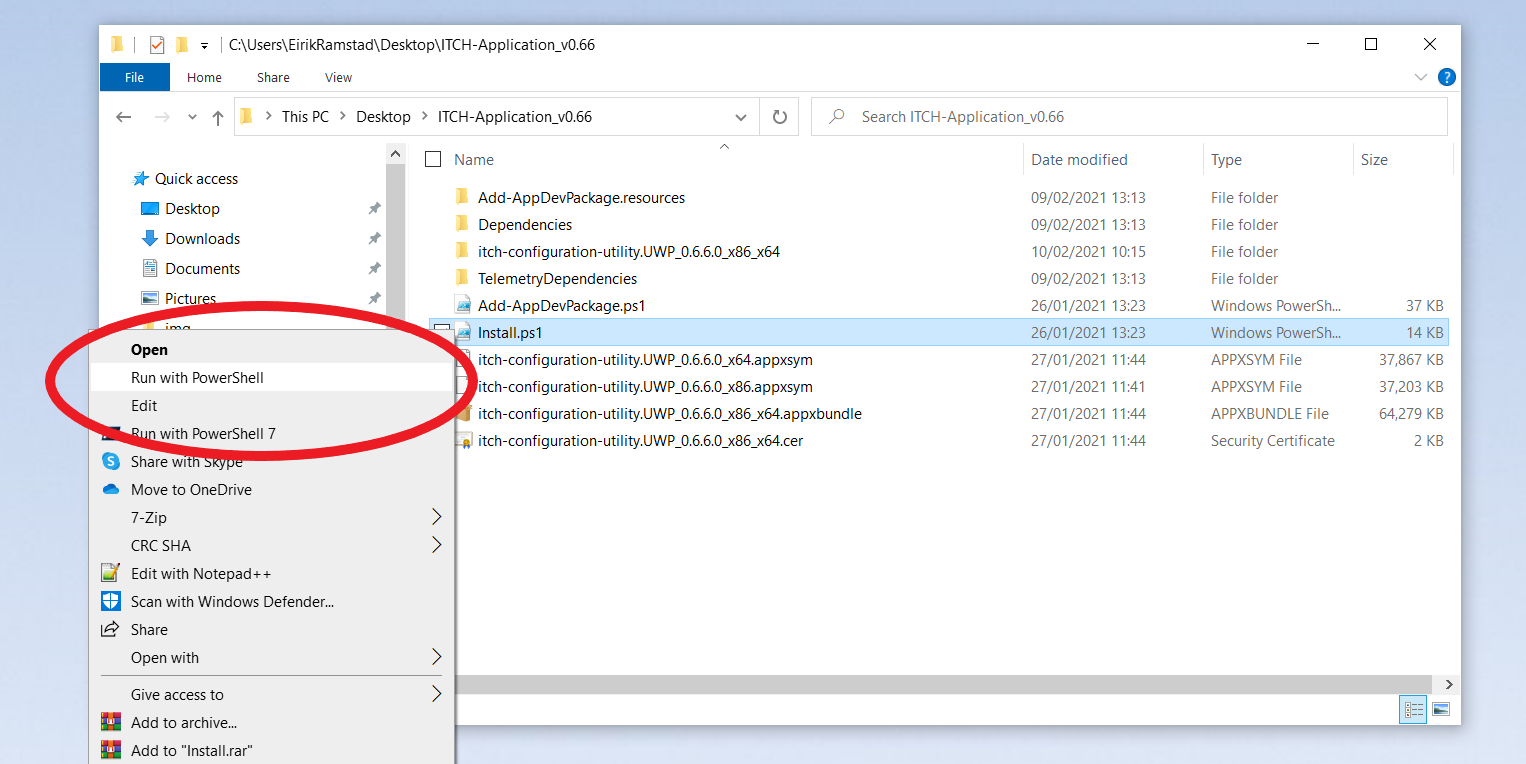
Power Shell approach
If you are having issues with the installation, you can try to install using the power shell approach.
Please put your computer into "Developer Mode" in the same settings window as you enabled sideloading described above.
Unzip the folder and run "Install.ps1" as a powershell script by right clicking the file and selecting "Run with PowerShell" as shown in the image below. Follow the prompts that appear.
If you don't have powershell installed on your computer, you can download it from here
When complete, the ITCH application should be installed on your computer and can found in the start menu.
Command line approach (System administrators)
The application can be installed using the command line and a supplied batch script. Download the zip file and extract the content.
By running "SilentInstall.bat" the application will install along with the necessary dependencies. The script will also install the required certificate and create the settings file. Provide the desired path for downloading log files as a string argument to the .bat script.
- Download zip file and extract content
- Run "SilentInstall.bat" in command prompt with administrator privileges.
SilentInstall.bat "C:\Users\someUser\Desktop"will make "someUser's" desktop the default location.
Note: The default file location can later be changed in the applications data folder.
Open %AppData%\LocalState\settings.txt and change the first line to the desired location.
%AppData% is the applications data folder. Usually located at C:\Windows\Users\someUser\AppData\Local\Packages\ITCH_App*..
First use of Application
When the application is started for the first time, it will check for file system access. This is necessary for saving the log files from the robot. If the application does not have the necessary privileges, a dialogue will show guiding the user to set the correct settings. Press "Ok" when asked to give "File System Access" permission.

A settings window will appear where the user needs to set the "File System" app permission to "On"
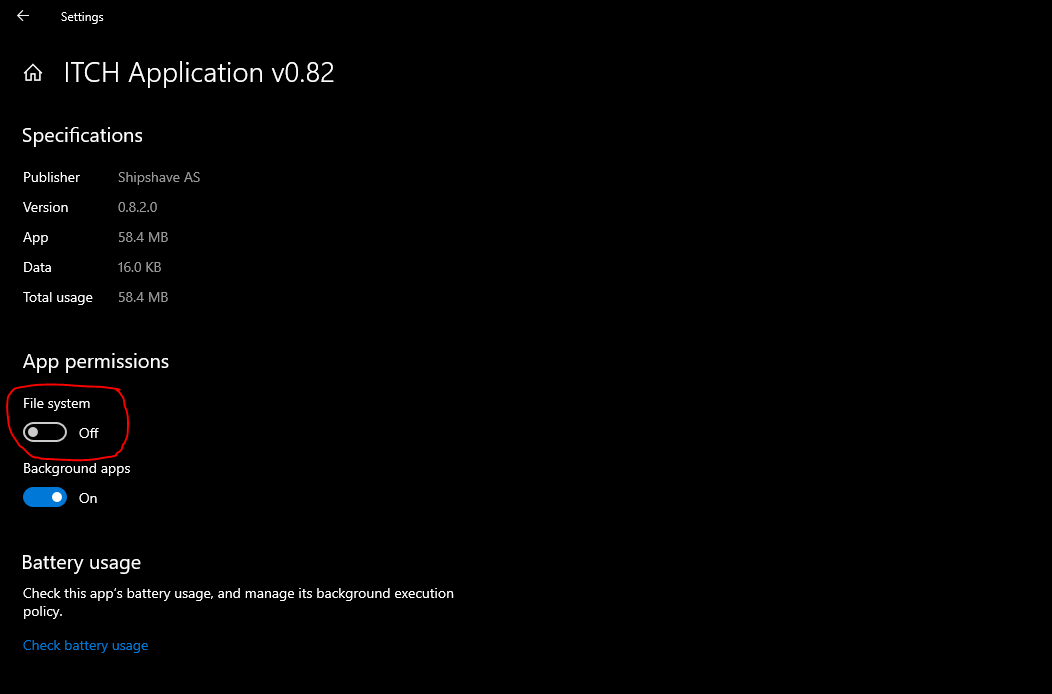
Note! The application will close once a setting is changed. This is to be expected. Simply open the application again. If the permission was set correctly, the "File System Access" dialogue will not show.
Updating The Software
To update the software, download the latest release, unzip and run the .appxbundle or .msixbundle installation file as described above. Then press update and the updated ITCH Application will get installed and replace the old version.

Updating The Firmware on the Robot
The firmware on the Robot can be updated using the ITCH Application. You can check if you have the latest version by comparing the version displayed within the connect window in the application with the latest version available on our website.
-
Within the connect page in the ITCH application after connecting to your Robot, note down what hardware and software firmware version you have.
-
Go to our downloads webpage and download the latest firmware file that matches to your hardware version.
-
Turn the Robot into firmware update mode by holding the switch in the on position for at least 10 seconds when powering it on. When the status light has gone blue you can release the switch.
-
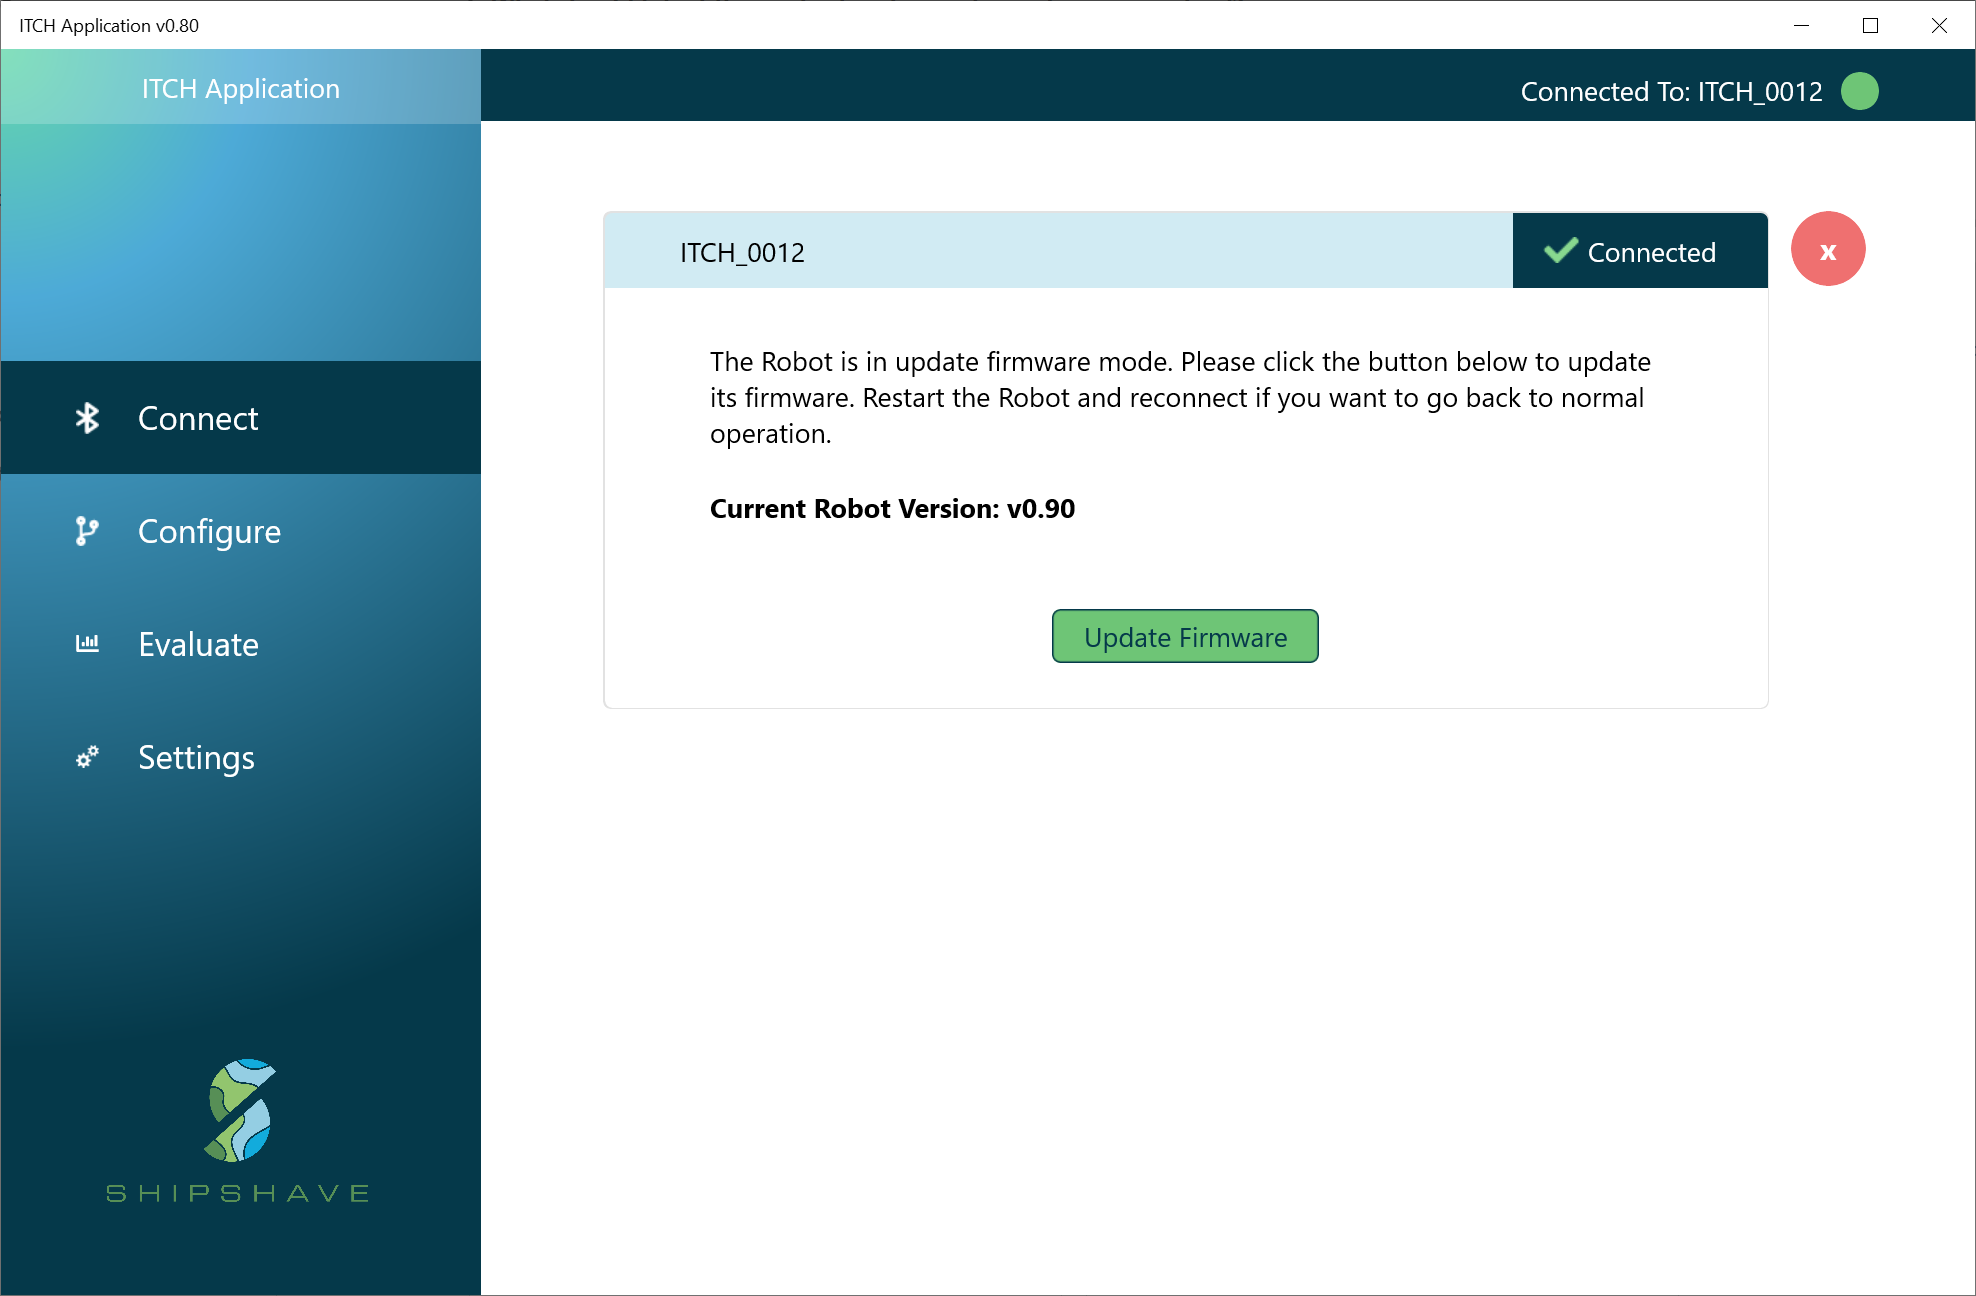
Reconnect to the Robot with the ITCH Application, when connected, the window shown in figure 6 should appear.
-
Click the "Update Firmware" button and select the firmware file downloaded from our website.
-
Once the update is complete, the Robot should restart and the status light should go green.
-
The window should update and show information about the robot. Press reload and check that the firmware version has updated.
Troubleshooting
What should I do if the application hangs during firmware upload?
Wait 20 seconds more, if nothing happens, turn the Robot off, restart application and reconnect to the Robot.
What should I do if the status light remains blue after uploading new firmware
Restart Robot. If still blue, try to reupload the firmware. If this doesn't help, please contact support@shipshave.no for further help.
Using the Application
Connect to Robot
The application can connect to the Robot wirelessly using Bluetooth. To connect to the device, make sure the device is turned on and the Robot status light is solid green. In order to get a reliable connection, make sure your computer is placed within a meter from the Robot tail with the status light facing the computer.
If your computer has never connected to this specific ITCH before, you must ensure that you connect to the Robot within the first two minutes after the unit is powered on.
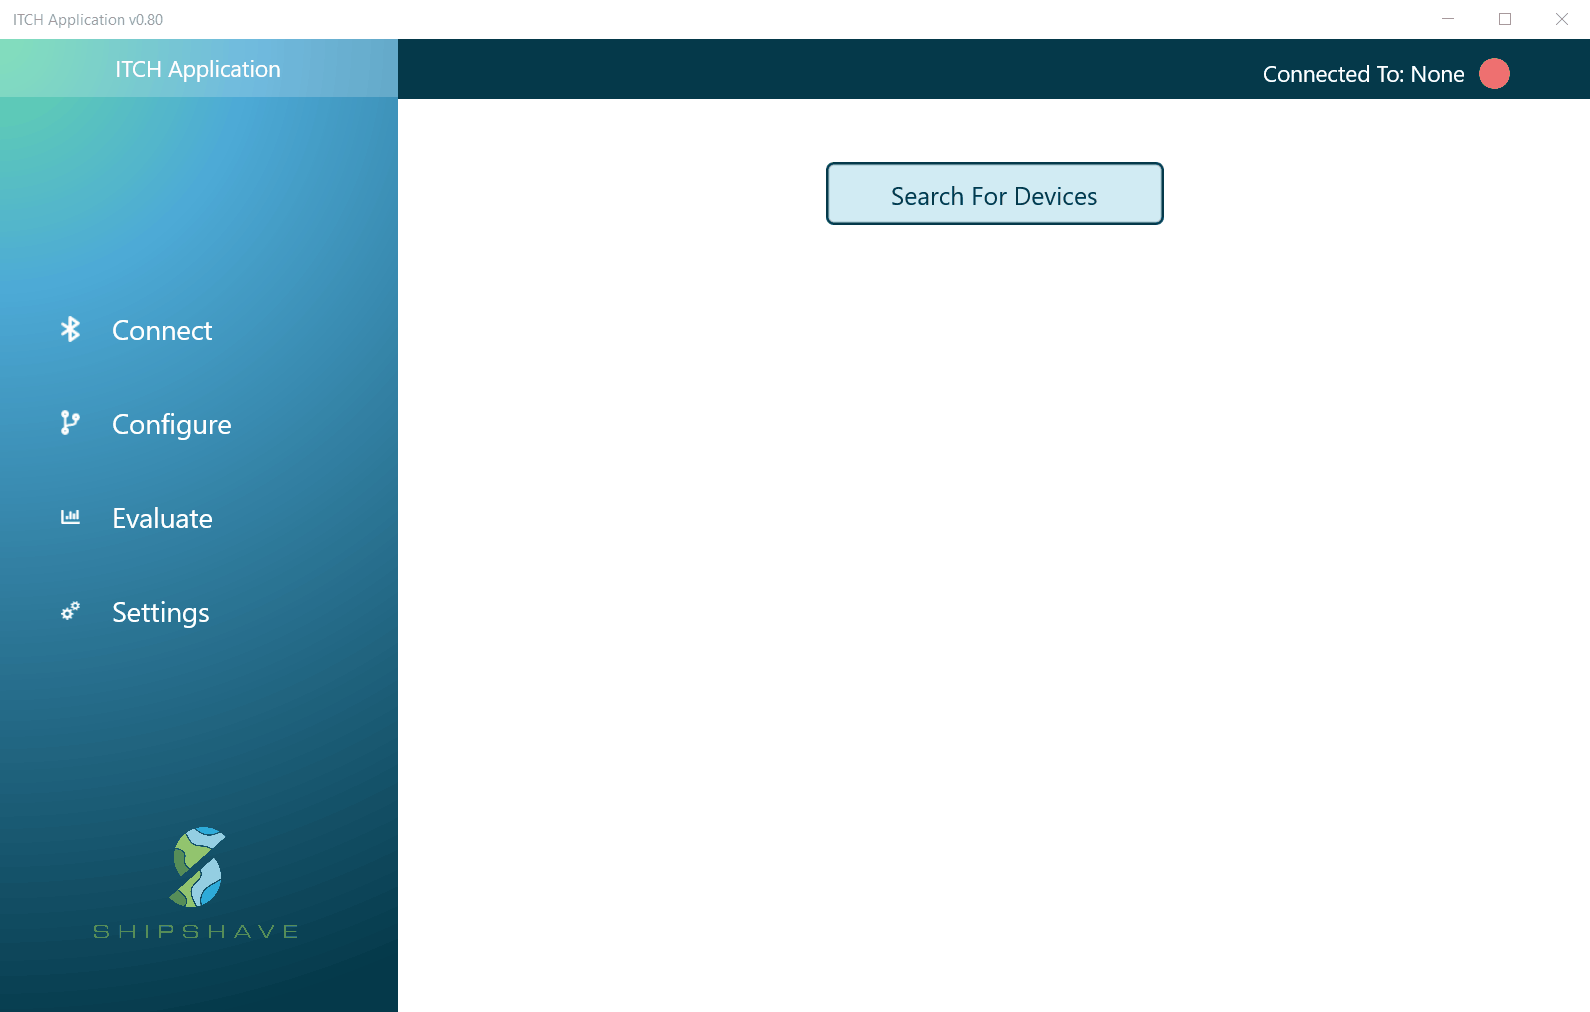
You can connect to the device by pressing "Search for Devices" within the "Connect" page in the application and pressing the "Connect" button beside the name of your ITCH unit. Each ITCH Robot is named ITCH_XXXX, where xxxx represents the serial number of the device.
Below is a gif demonstrating how to connect, configure, download, clear memory and disconnect from the robot.
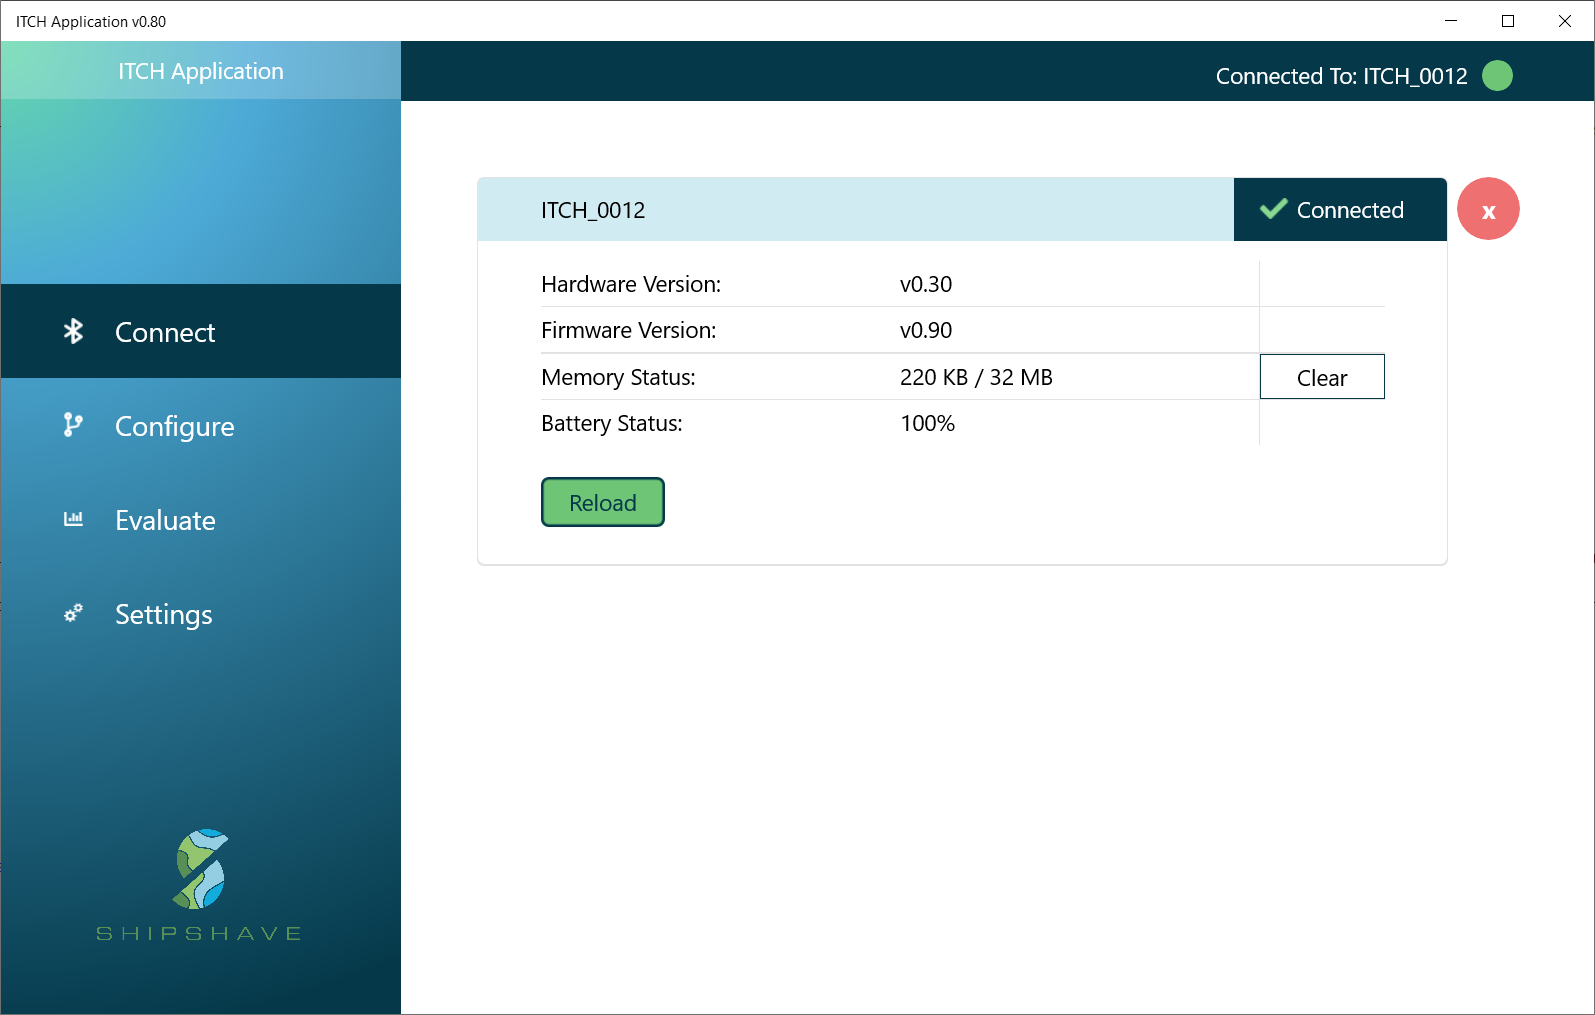
When the application has successfully connected to the device, the device info screen shown in Figure 2 will replace the connect page. This page gives you basic information about the device. You can press "Reload" to get the latest device information. If you restart the Robot, you must also manually disconnect and reconnect to the device through the application to re-establish the connection. It is good practice to clear the memory of the Robot before cleaning by pressing the "Clear" button. This ensures that the Robot it will start logging to a "clean slate" and you don't mix data between cleaning sessions.
Cannot connect to the ITCH via Bluetooth
1. Is the ITCH charged and powered ON?
2. Is the Bluetooth function enabled on the unit you are trying to connect with?
3. Is the connecting unit within 0,5m from the ITCH?
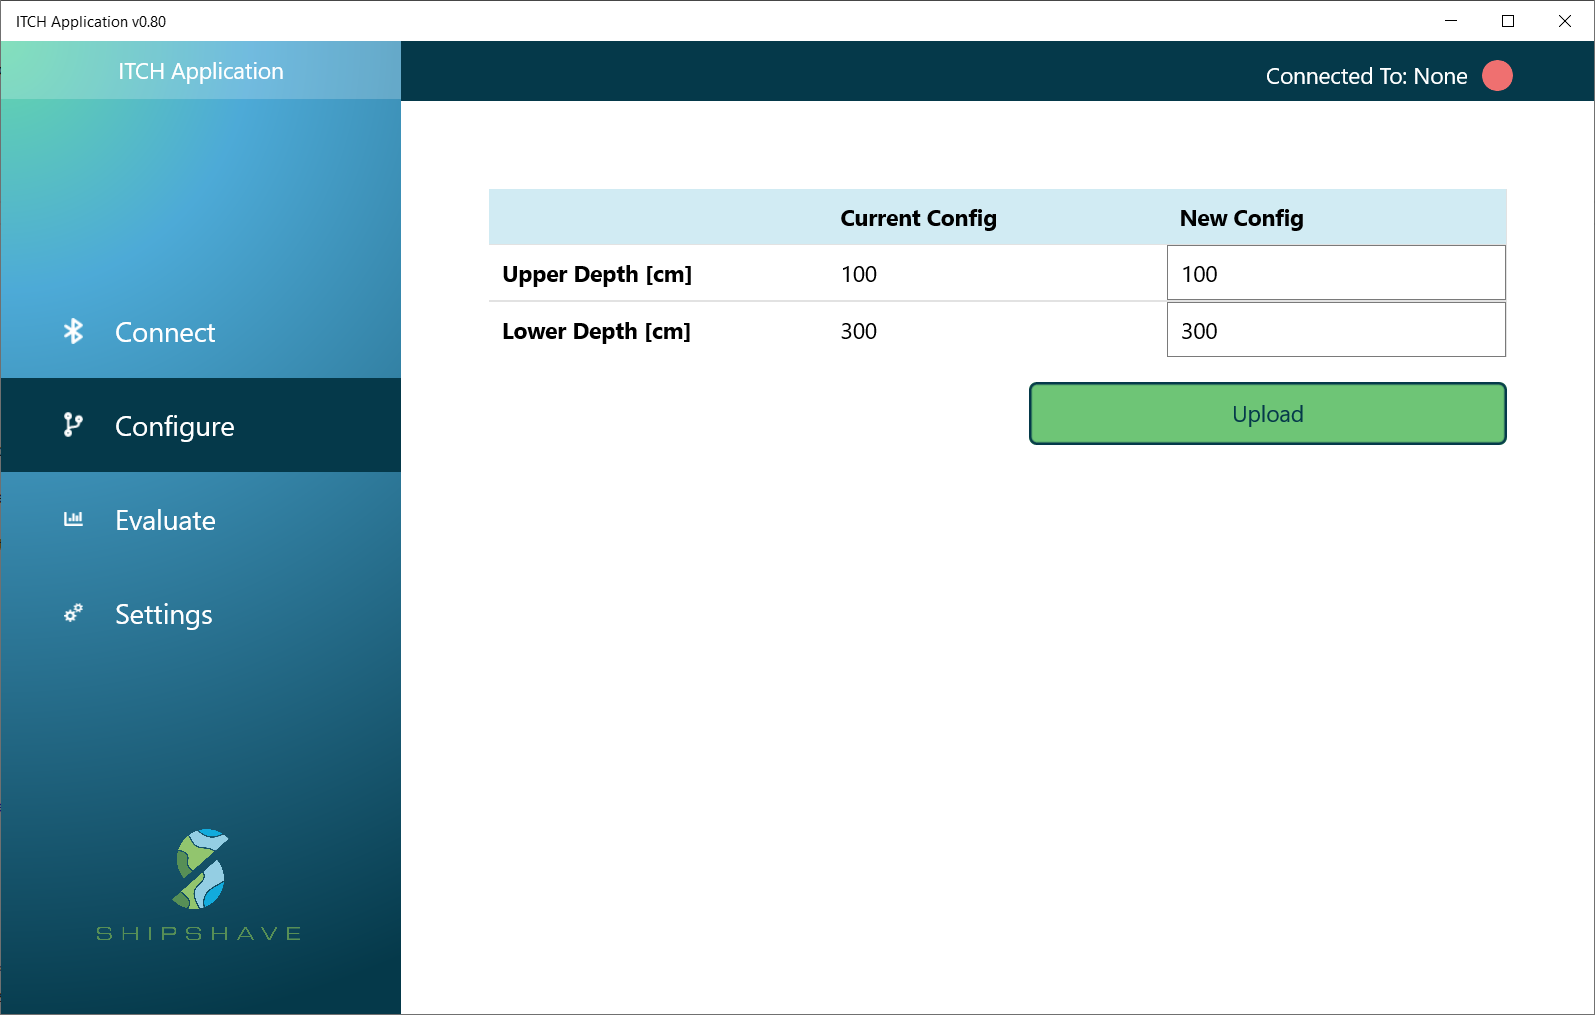
Configure Robot
The operating settings for the ITCH Robot should be configured before each run to optimize the units cleaning coverage and prevent issues during cleaning.
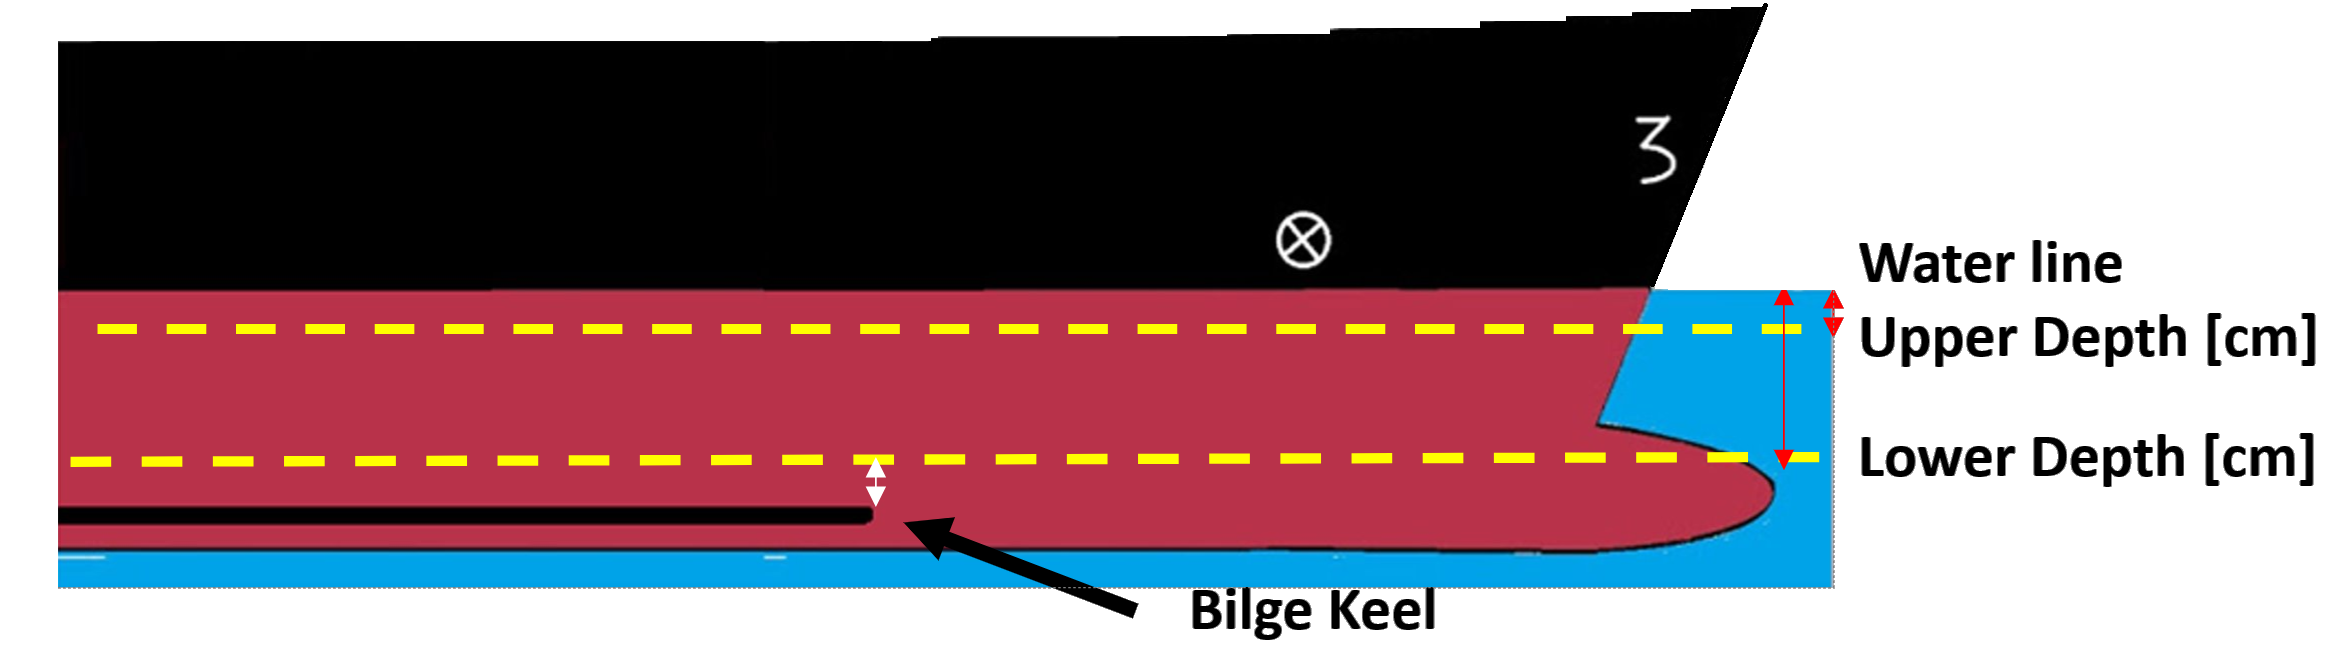
Upper Depth - Defines the upper depth limit to which the Robot should clean within. We recommend to configure the upper depth a certain margin below the surface of the water to ensure that the device doesn't get disturbed by waves and other turbulence in the surface during cleaning. For example 100cm.
Lower Depth - Defines the lower depth limit the Robot should clean within. The lower depth should be chosen based on the draft of the ship, its trim and the location of a bilge keel if present. It recommended to select a depth above the minimum depth of the bilge keel to ensure that the Robot doesn't get stuck under the bilge keel.
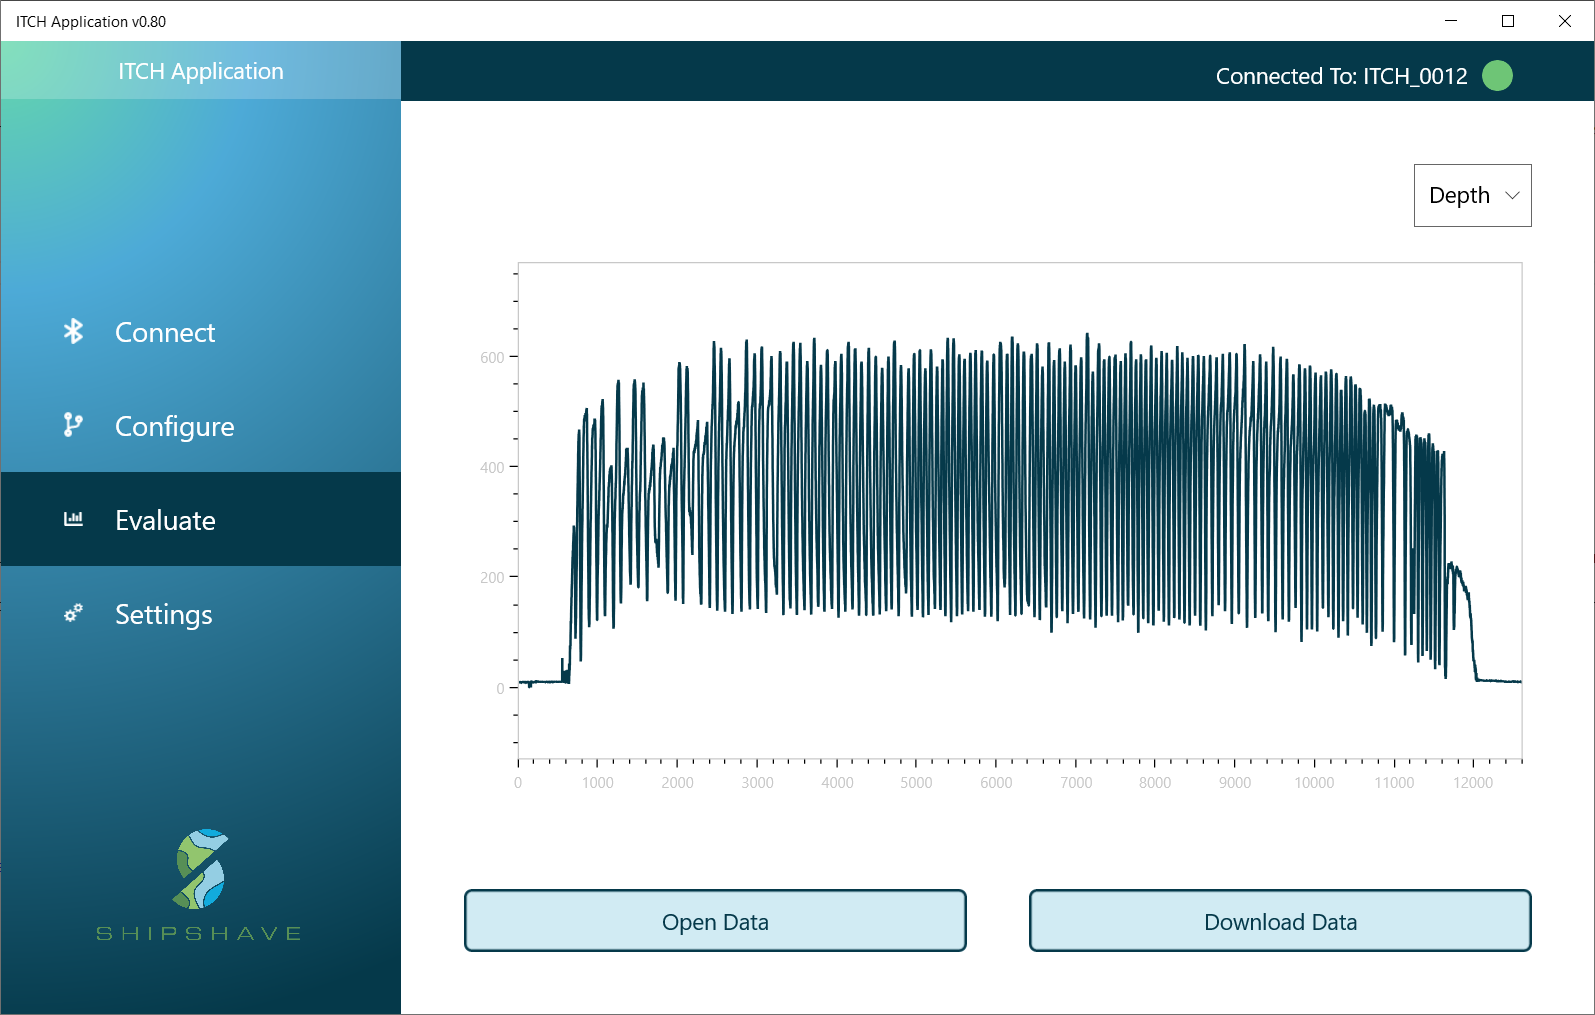
Evaluate Results
The Robots cleaning behavior and coverage along the side of the hull can be reviewed after a cleaning session using the Evaluate section in the application. This is done by downloading the sensor data from the Robot and plotting its depth measurements over time by pressing "Download Data". The status light on the RObot should now starting blinking in blue. The downloading process might take a while depending on how much data you have stored on the Robot. When the download is finished and you have saved the data to your computer, a plot with the depth measurements should automatically pop up. The depth in cm is plotted on the y-axis, and sample in the x-axis. (The Robot samples the measurements at a rate of 5 samples/second)
A successful cleaning plot should show a sine wave going between the upper and lower depths that were configured before the cleaning.
The saved data can then be opened and reviewed at a later point using the "Open Data" button.
After you have saved the data, it is good practice to delete the data from the unit by pressing the "Delete Data" button. This ensures that the next time you use the Robot it will start logging to a "clean slate" and you don't mix data between cleaning sessions.
Application Settings
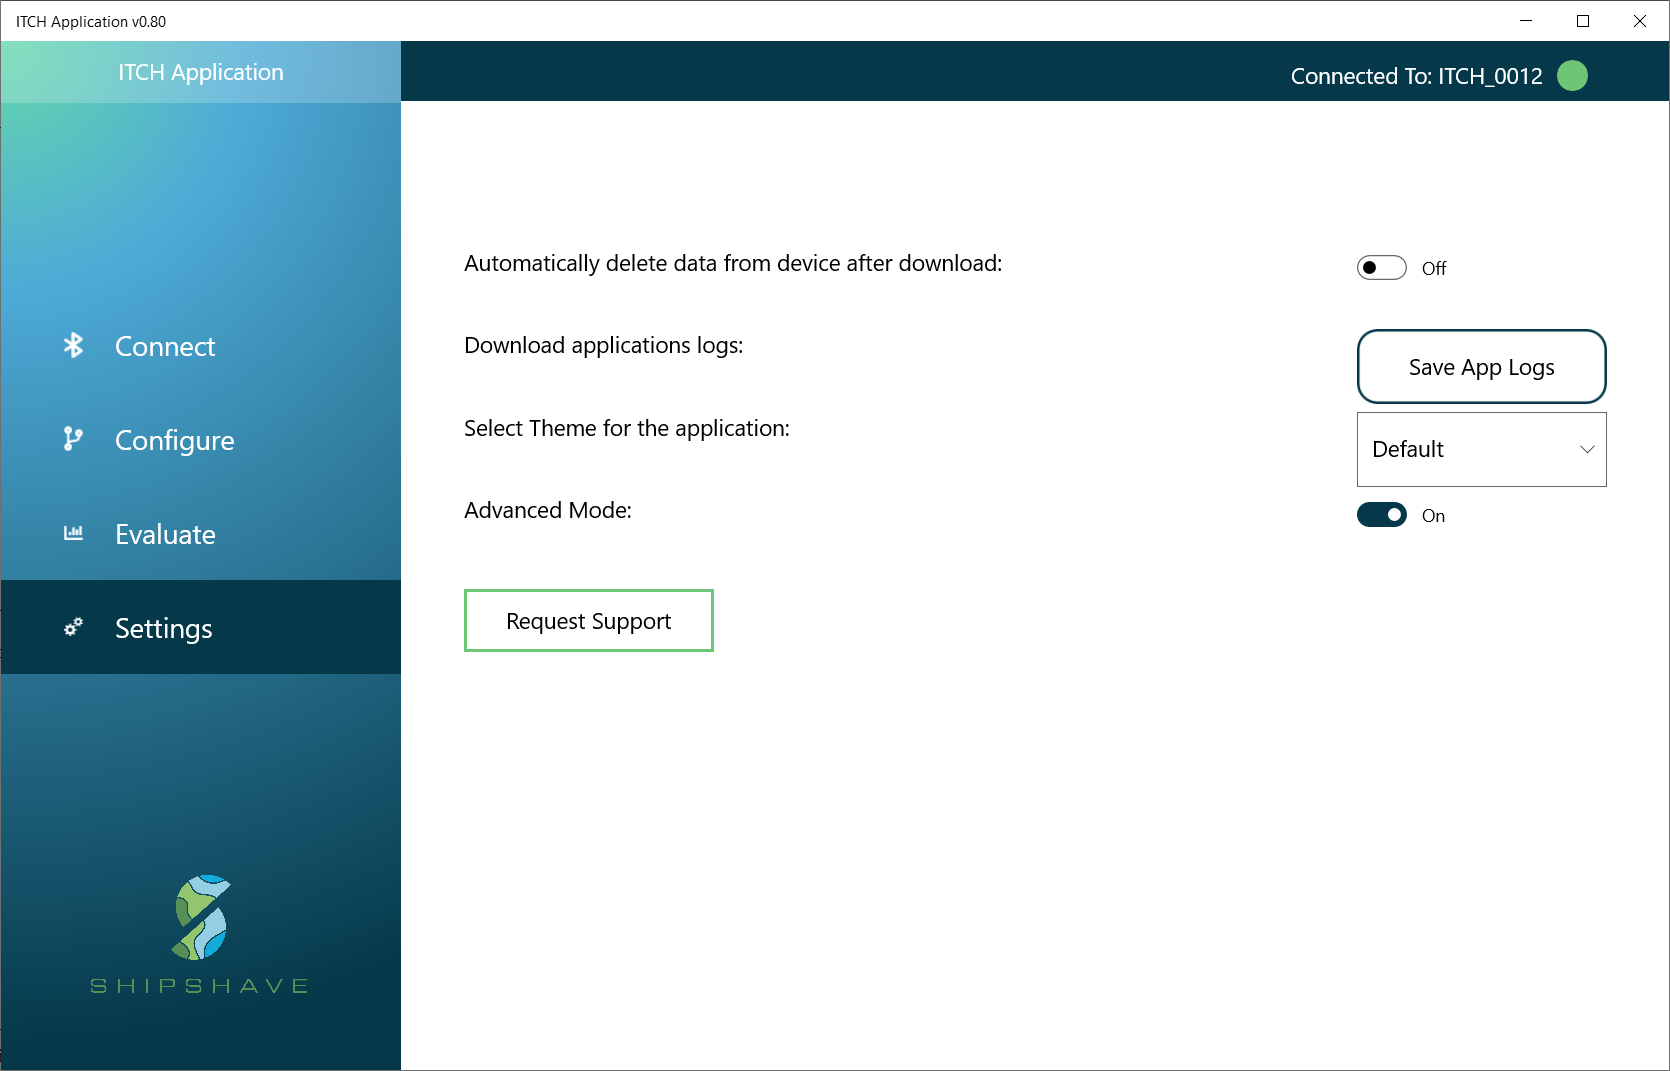
Advanced Mode
Advanced mode can be enabled through the settings page. It opens up more advanced features which should be used with care.
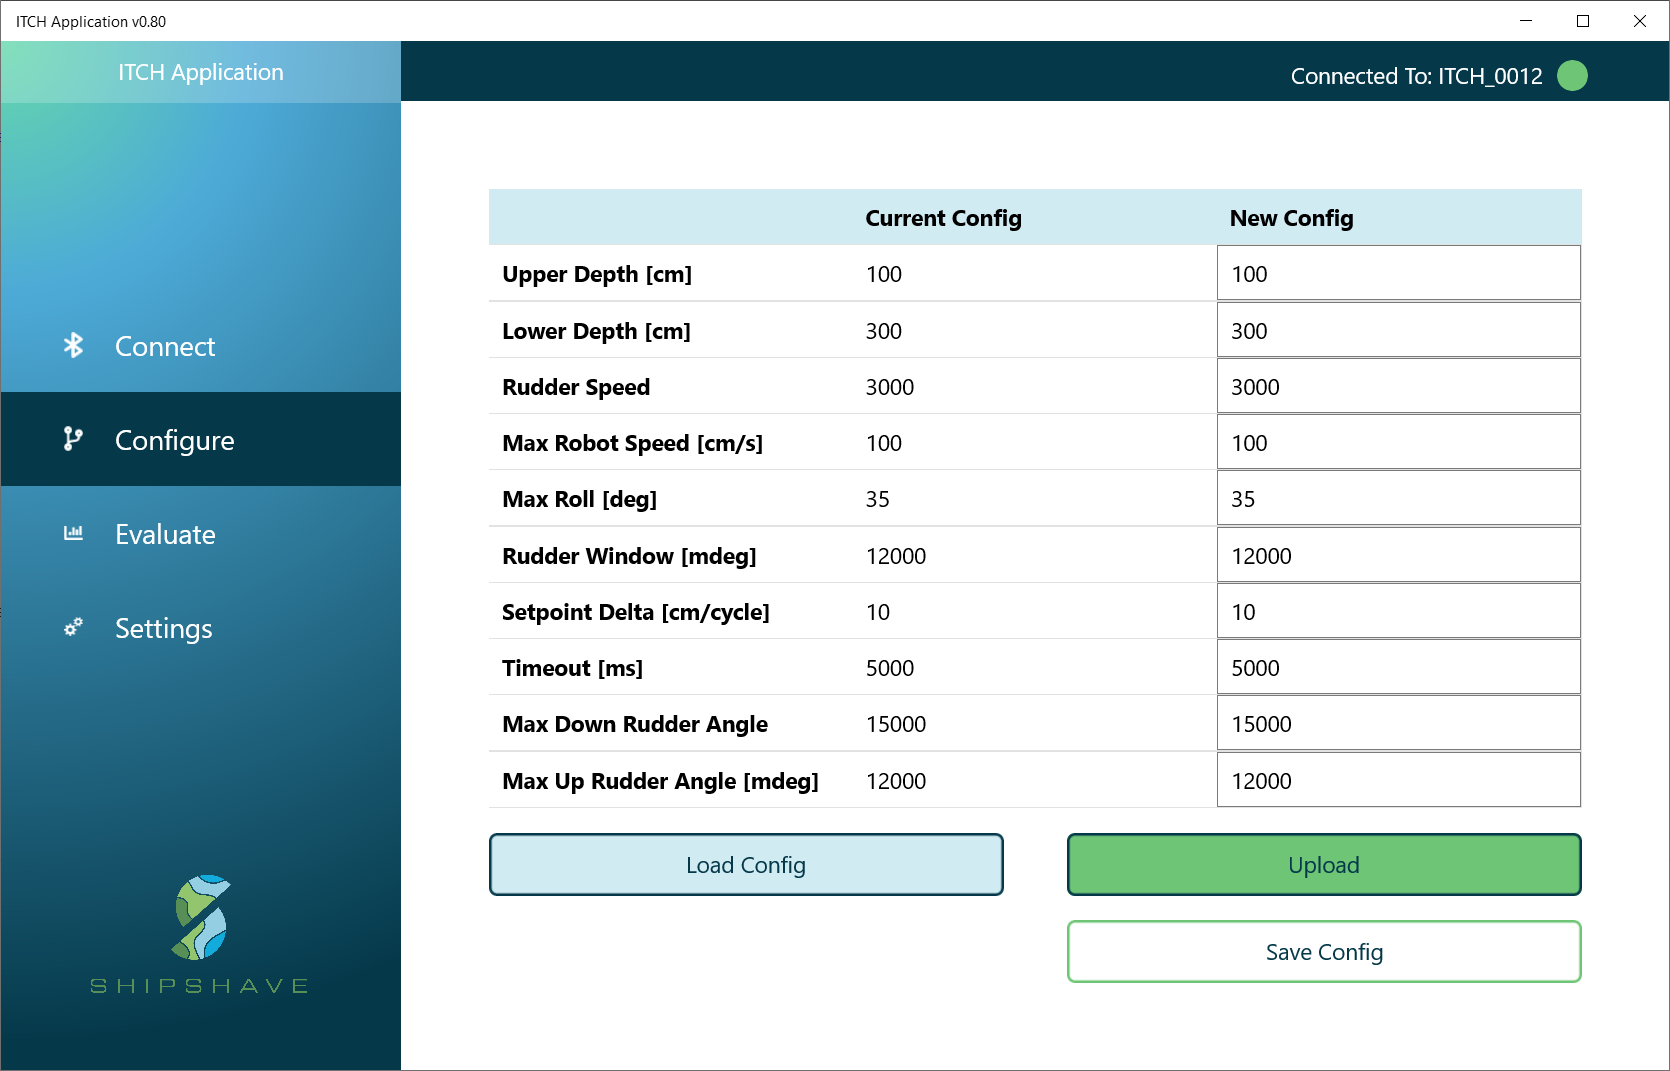
Advanced Configuration
Advanced mode allows you to configure more parameters to fine tune the operation of the Robot.
Advanced Evaluation
Advanced mode also allows you to plot and evaluate more sensor values such as: Roll, Pitch, Battery, Rudder Angles and Setpoints.
Frequently Asked Questions
How do we change between meters/feet?
The User Software allows for this change.
How do we change between 12/24hrs?
The User Software allows for this change.
Where is new firmware available?
Please visit www.shipshave.no
Where can I download a User Guide?
It can be downloaded here