Introduction
Shipshave’s In Transit Cleaning of Hulls (ITCH) is a semi-autonomous hull cleaning system designed to maintain a vessel’s hull. Regular use reduces fuel consumption and limits the spread of invasive species. ITCH can be operated by ship staff without special training and requires no vessel modifications.
This guide provides instructions, safety information, and maintenance guidelines.
Video introduction
Safety Information
ITCH is designed to be used under certain operating conditions. Please adhere to these conditions to ensure the safety of the crew, the vessel and the system.
Operating conditions
Required
- Ship speed 10–14 kn.
- Wave height:
- less than 2 m when draft is shallower than 11 m.
- less than 3 m when draft is deeper than 11 m.
Preferred (optional)
- Clean on the leeward side.
- Daylight operations.
- Trim near even keel.
For high speed vessels
By satisfying the conditions below, you can deploy ITCH at up to 17 knots.
- Use of black brushes
- Deployment on leeward side
- Trim near even keel
- Wave height less than 1.5m.
Cleaning Setup
This chapter covers robot assembly, brush selection, towbar setup, and rope path setup.
Robot Assembly
Video tutorial
Components of ITCH Robot Kit
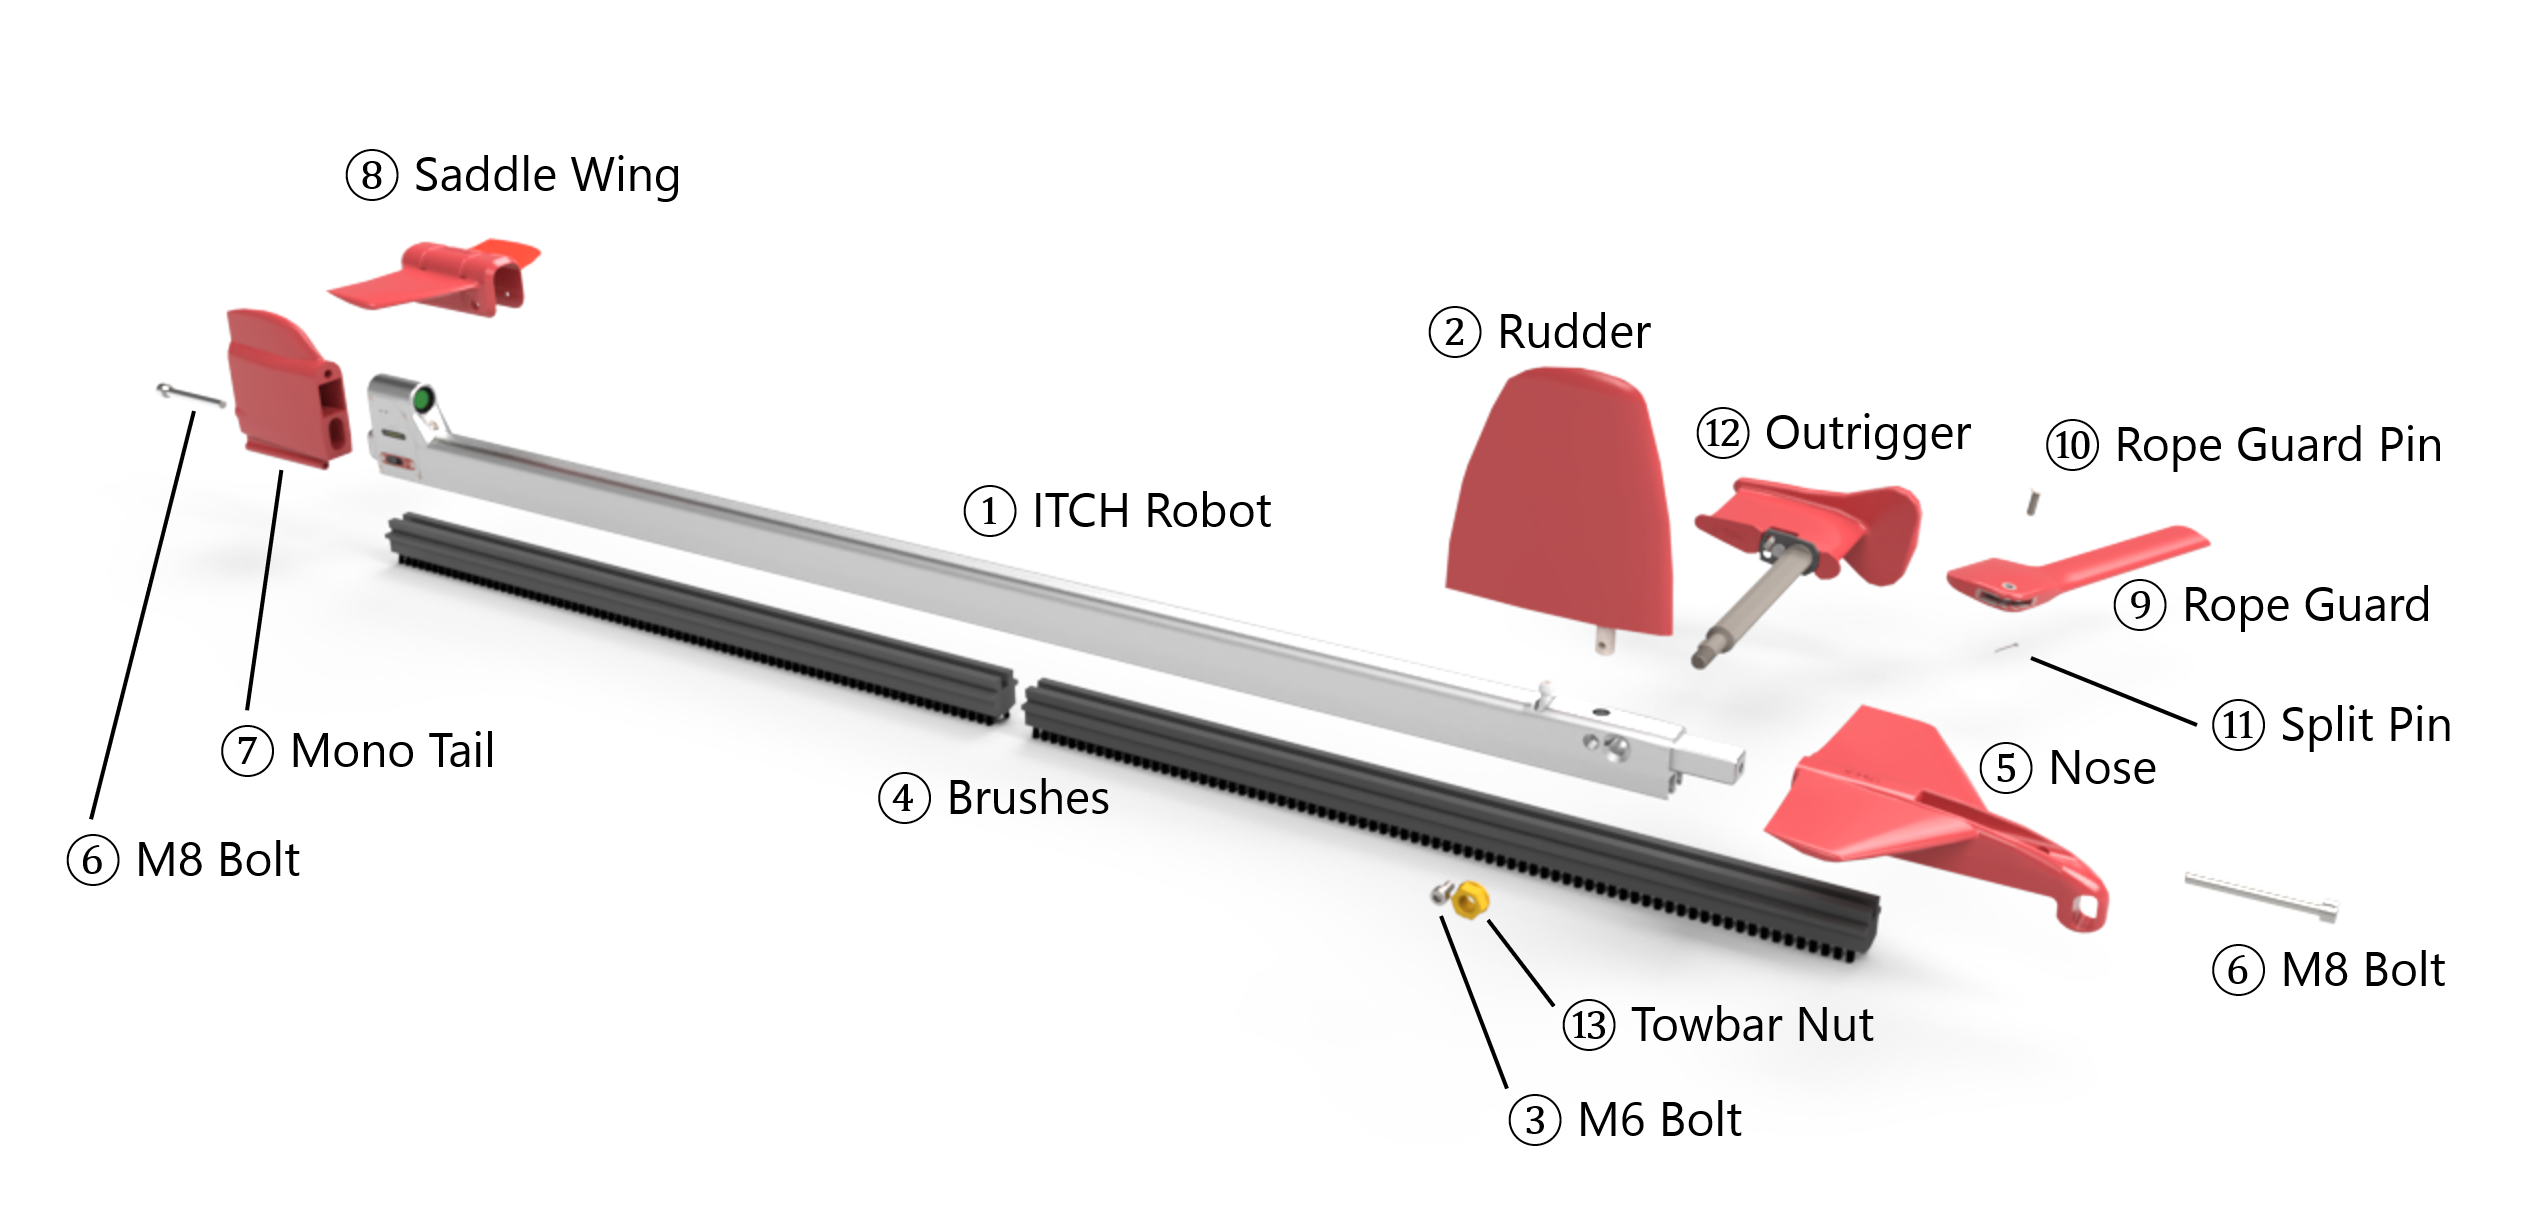
Components of ITCH Robot Kit.
| # | Name | Description |
|---|---|---|
| ① | ITCH Robot | Main body/profile housing motors, sensors, and interfaces for attachments and cable. |
| ② | Rudder | Hydrodynamic fin that controls the robot’s vertical movement on the hull. |
| ③ | M6 Bolt | Fastener for ② Rudder. |
| ④ | Brushes | Cleaning elements mounted along the rail; select type by fouling condition. See Brush Selection. |
| ⑤ | Nose | Forward fairing that stabilizes the robot on the hull and secures ④ Brushes. |
| ⑥ | M8 Bolt | Fastener for ⑤ Nose and ⑦ Mono Tail. |
| ⑦ | Mono Tail | Aft fairing that streamlines flow. |
| ⑧ | Saddle Wing | Auxiliary foil that improves on-hull stability; mounts over the aft profile with cable ties. |
| ⑨ | Rope Guard | Protective cover that shields the rope from edges. |
| ⑩ | Rope Guard Pin | Clevis pin joining ⑨ Rope Guard to ⑫ Outrigger; used with ⑪ Split Pin. |
| ⑪ | Split Pin | Retainer for ⑩ Rope Guard Pin. |
| ⑫ | Outrigger | Arm connecting ① ITCH Robot to the rope through ⑨ Rope Guard. See Outrigger Setup. |
| ⑬ | Towbar Nut | Locknut for ⑫ Outrigger. |
Assembly step-by-step guide
Refer to the numbered part names in the exploded view above.
-
Install Rudder — Mount ② Rudder to ① ITCH Robot using ③ M6 Bolt.
-
Install Brushes and Nose — Fit ④ Brushes and secure with ⑤ Nose using ⑥ M8 Bolt.
-
Install Mono Tail — Attach ⑦ Mono Tail with ⑥ M8 Bolt.
-
Mount Saddle Wing — Mount ⑧ Saddle Wing at the aftmost section of the profile using cable ties.
-
Attach Rope Guard to Outrigger — After the rope path is set, thread the rope through ⑨ Rope Guard and tie a bowline.
Then join to ⑫ Outrigger with ⑩ Rope Guard Pin and secure with ⑪ Split Pin. -
Install Outrigger — Mount ⑫ Outrigger and secure with ⑬ Towbar Nut. See Towbar Setup.
⚠️ Rope Guard orientation:
| ✅ Correct — rotates toward the wider edge of the outrigger | ❌ Wrong — rotates toward the narrow edge of the outrigger. |
|---|---|
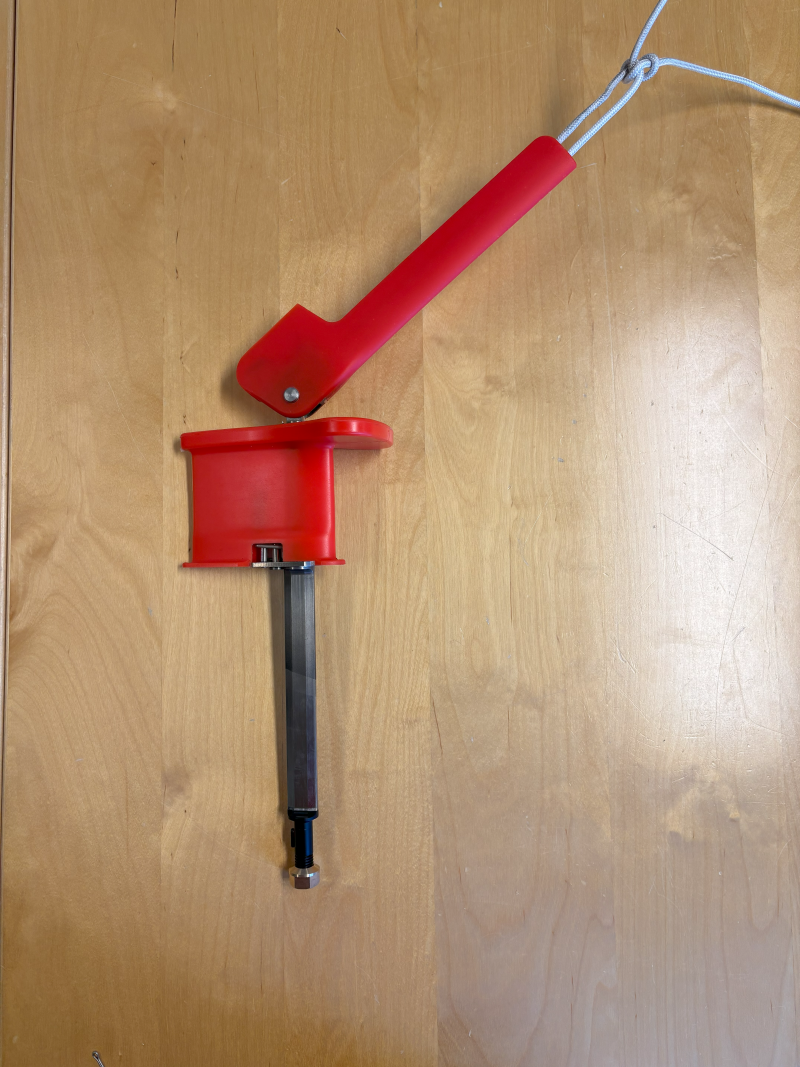 | 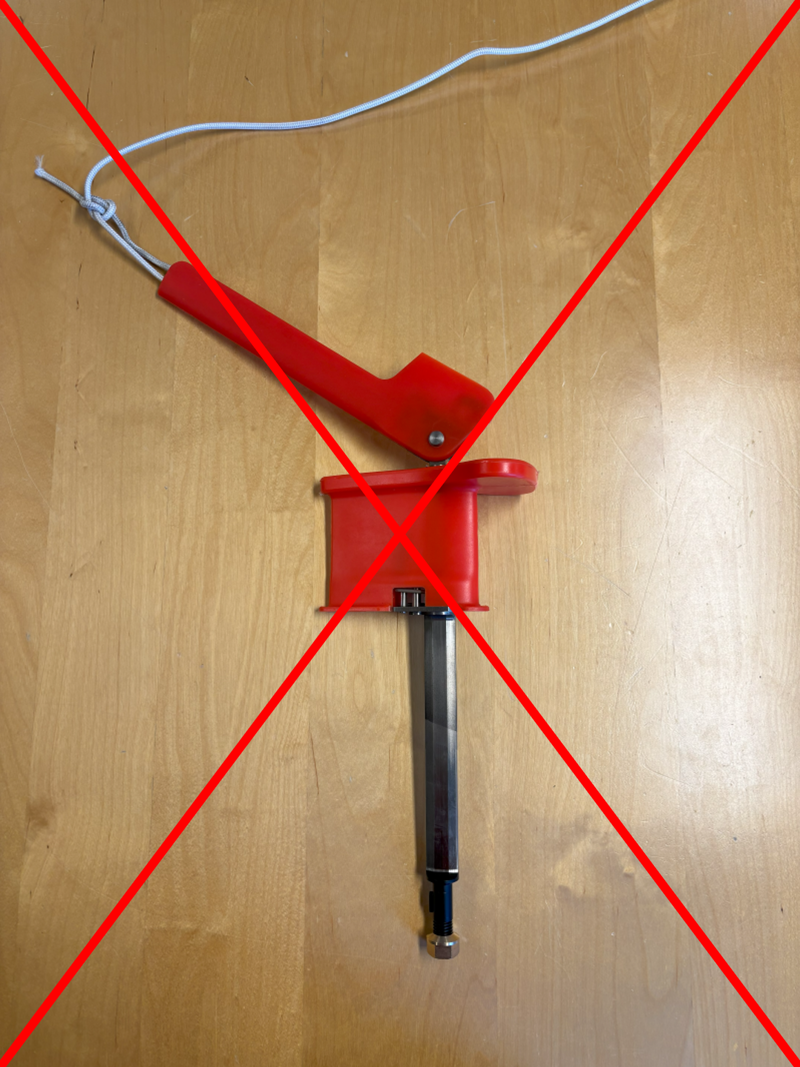 |
Brush Selection
Each brush type has been tested by a third-party laboratory and proven to cause negligible coating wear.
Quick Reference
| Fouling level | Recommended brush |
|---|---|
| Light slime / biofilm | Black Brushes |
| Heavier slime | Red Brushes |
| Heavy slime / weed | Blue Brushes |
| Green grass (advanced) | Clearing Brush (+ Black Brushes in front) |
| Hard fouling (barnacles) | Barnacle Rollers |
Brush Types
| Black Brushes | Red Brushes |
|---|---|
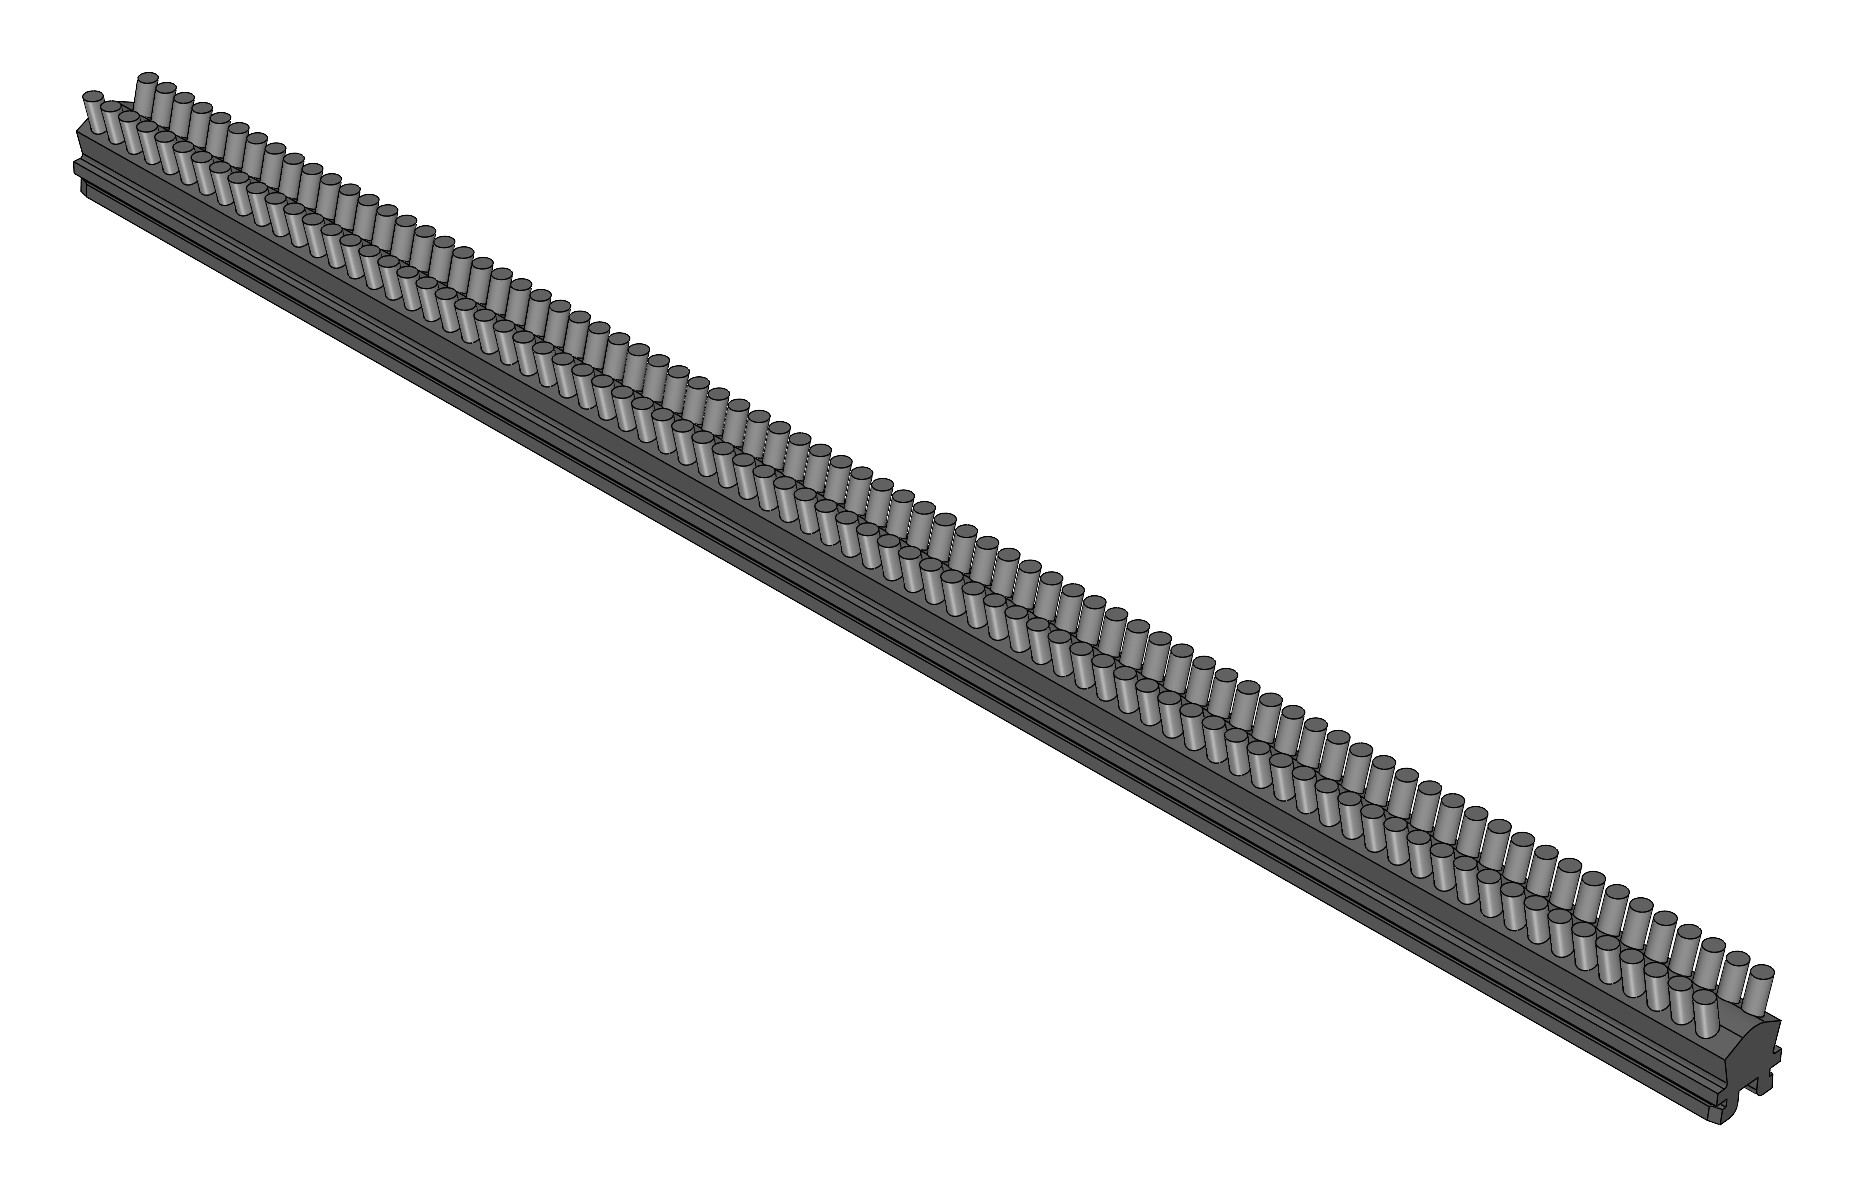 | 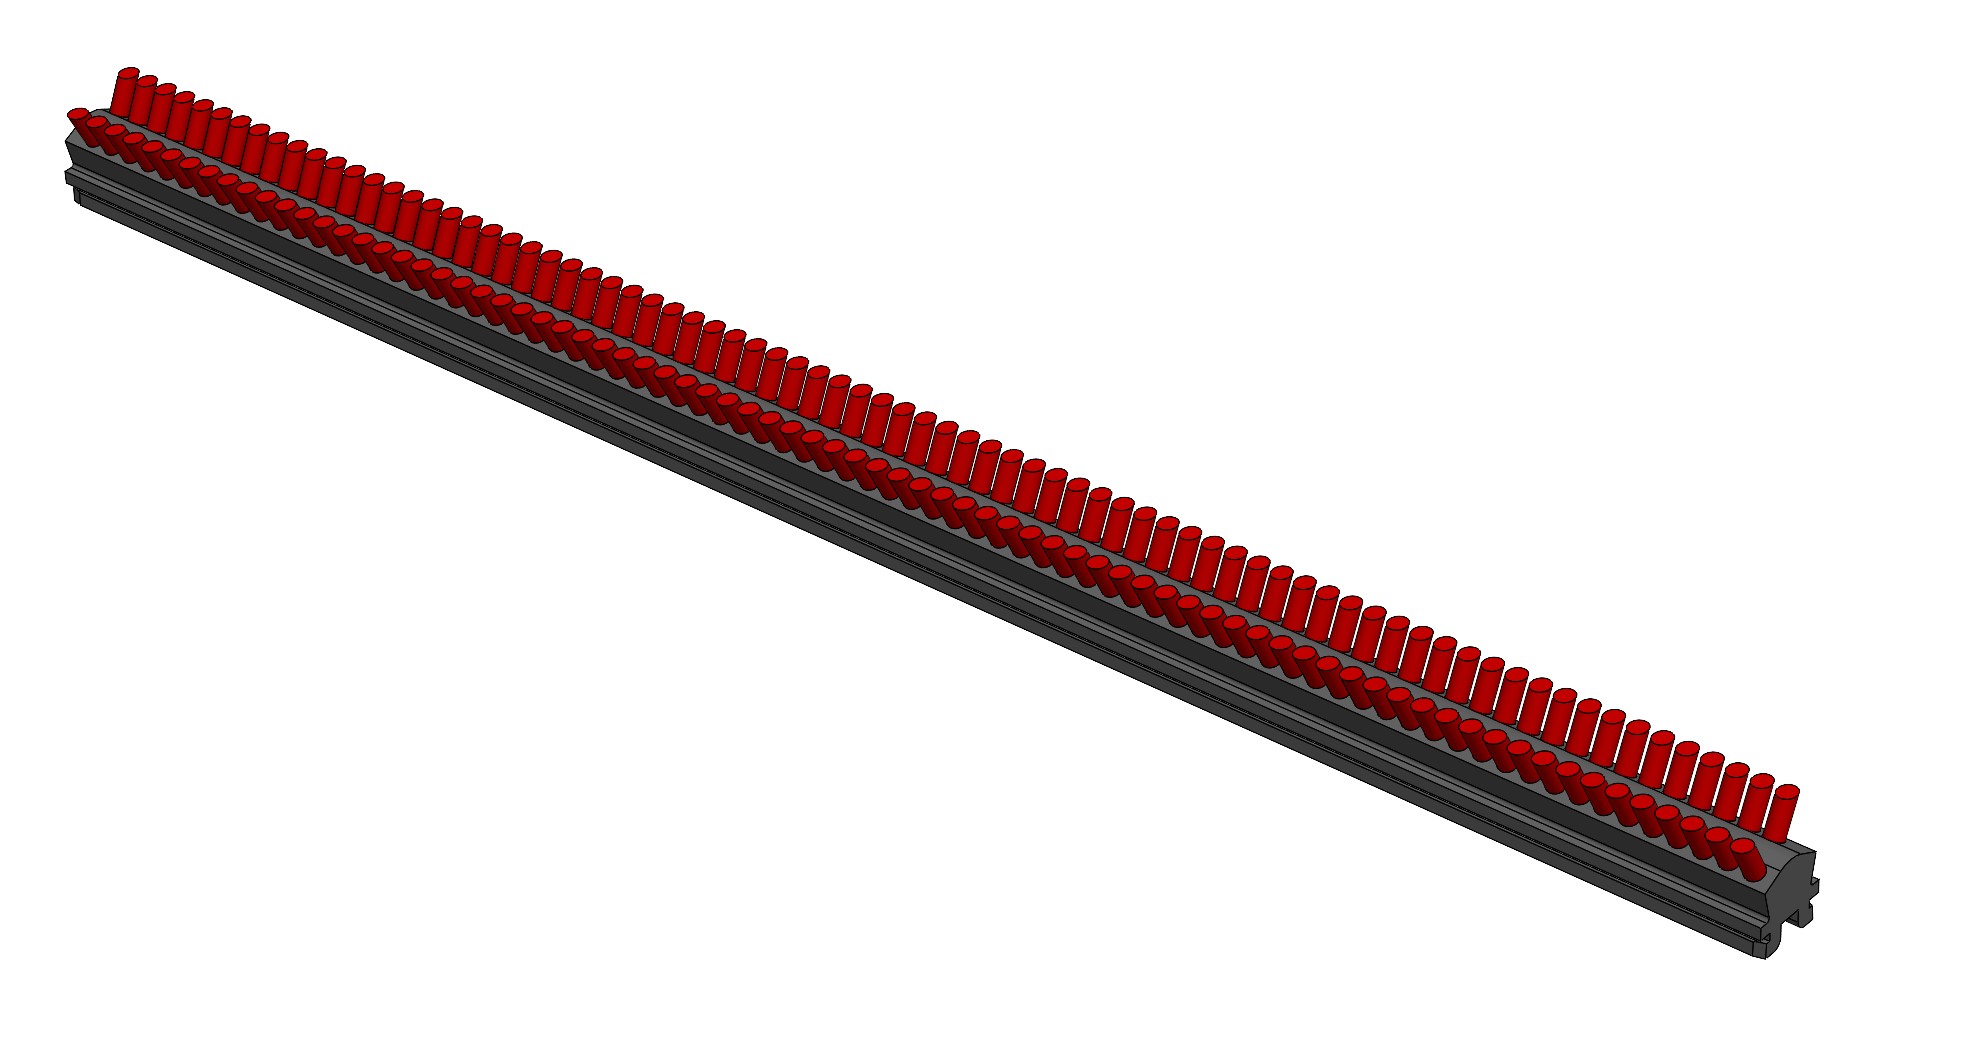 |
| Best for light slime/biofilm (≈ year 1–3). Great for routine maintenance choice. | Best for heavier slime. Often first clean on 2–4-year coatings. |
| Blue Brushes | Clearing Brush |
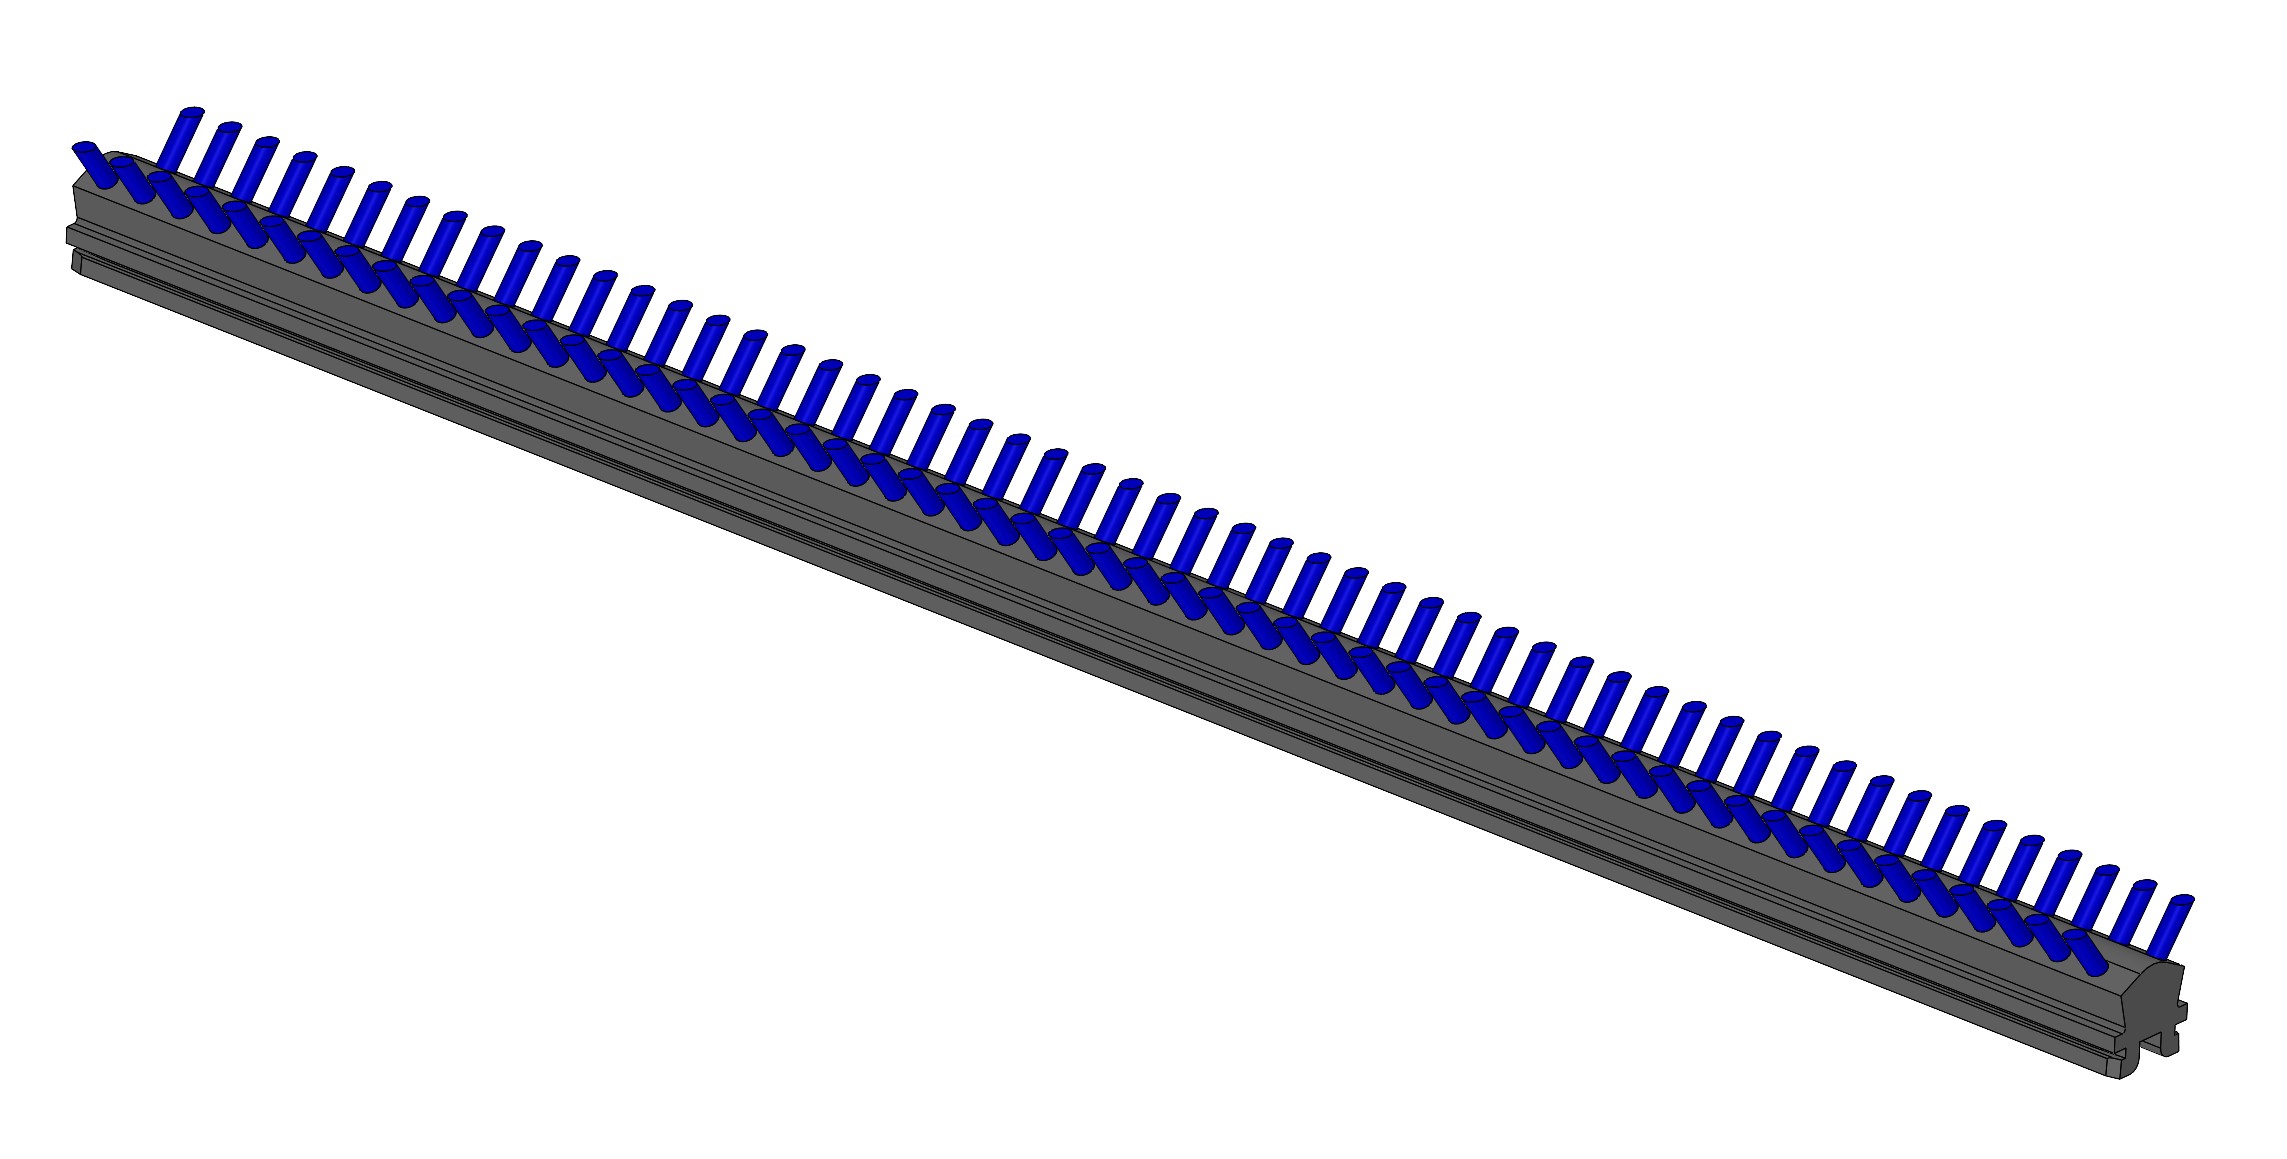 | 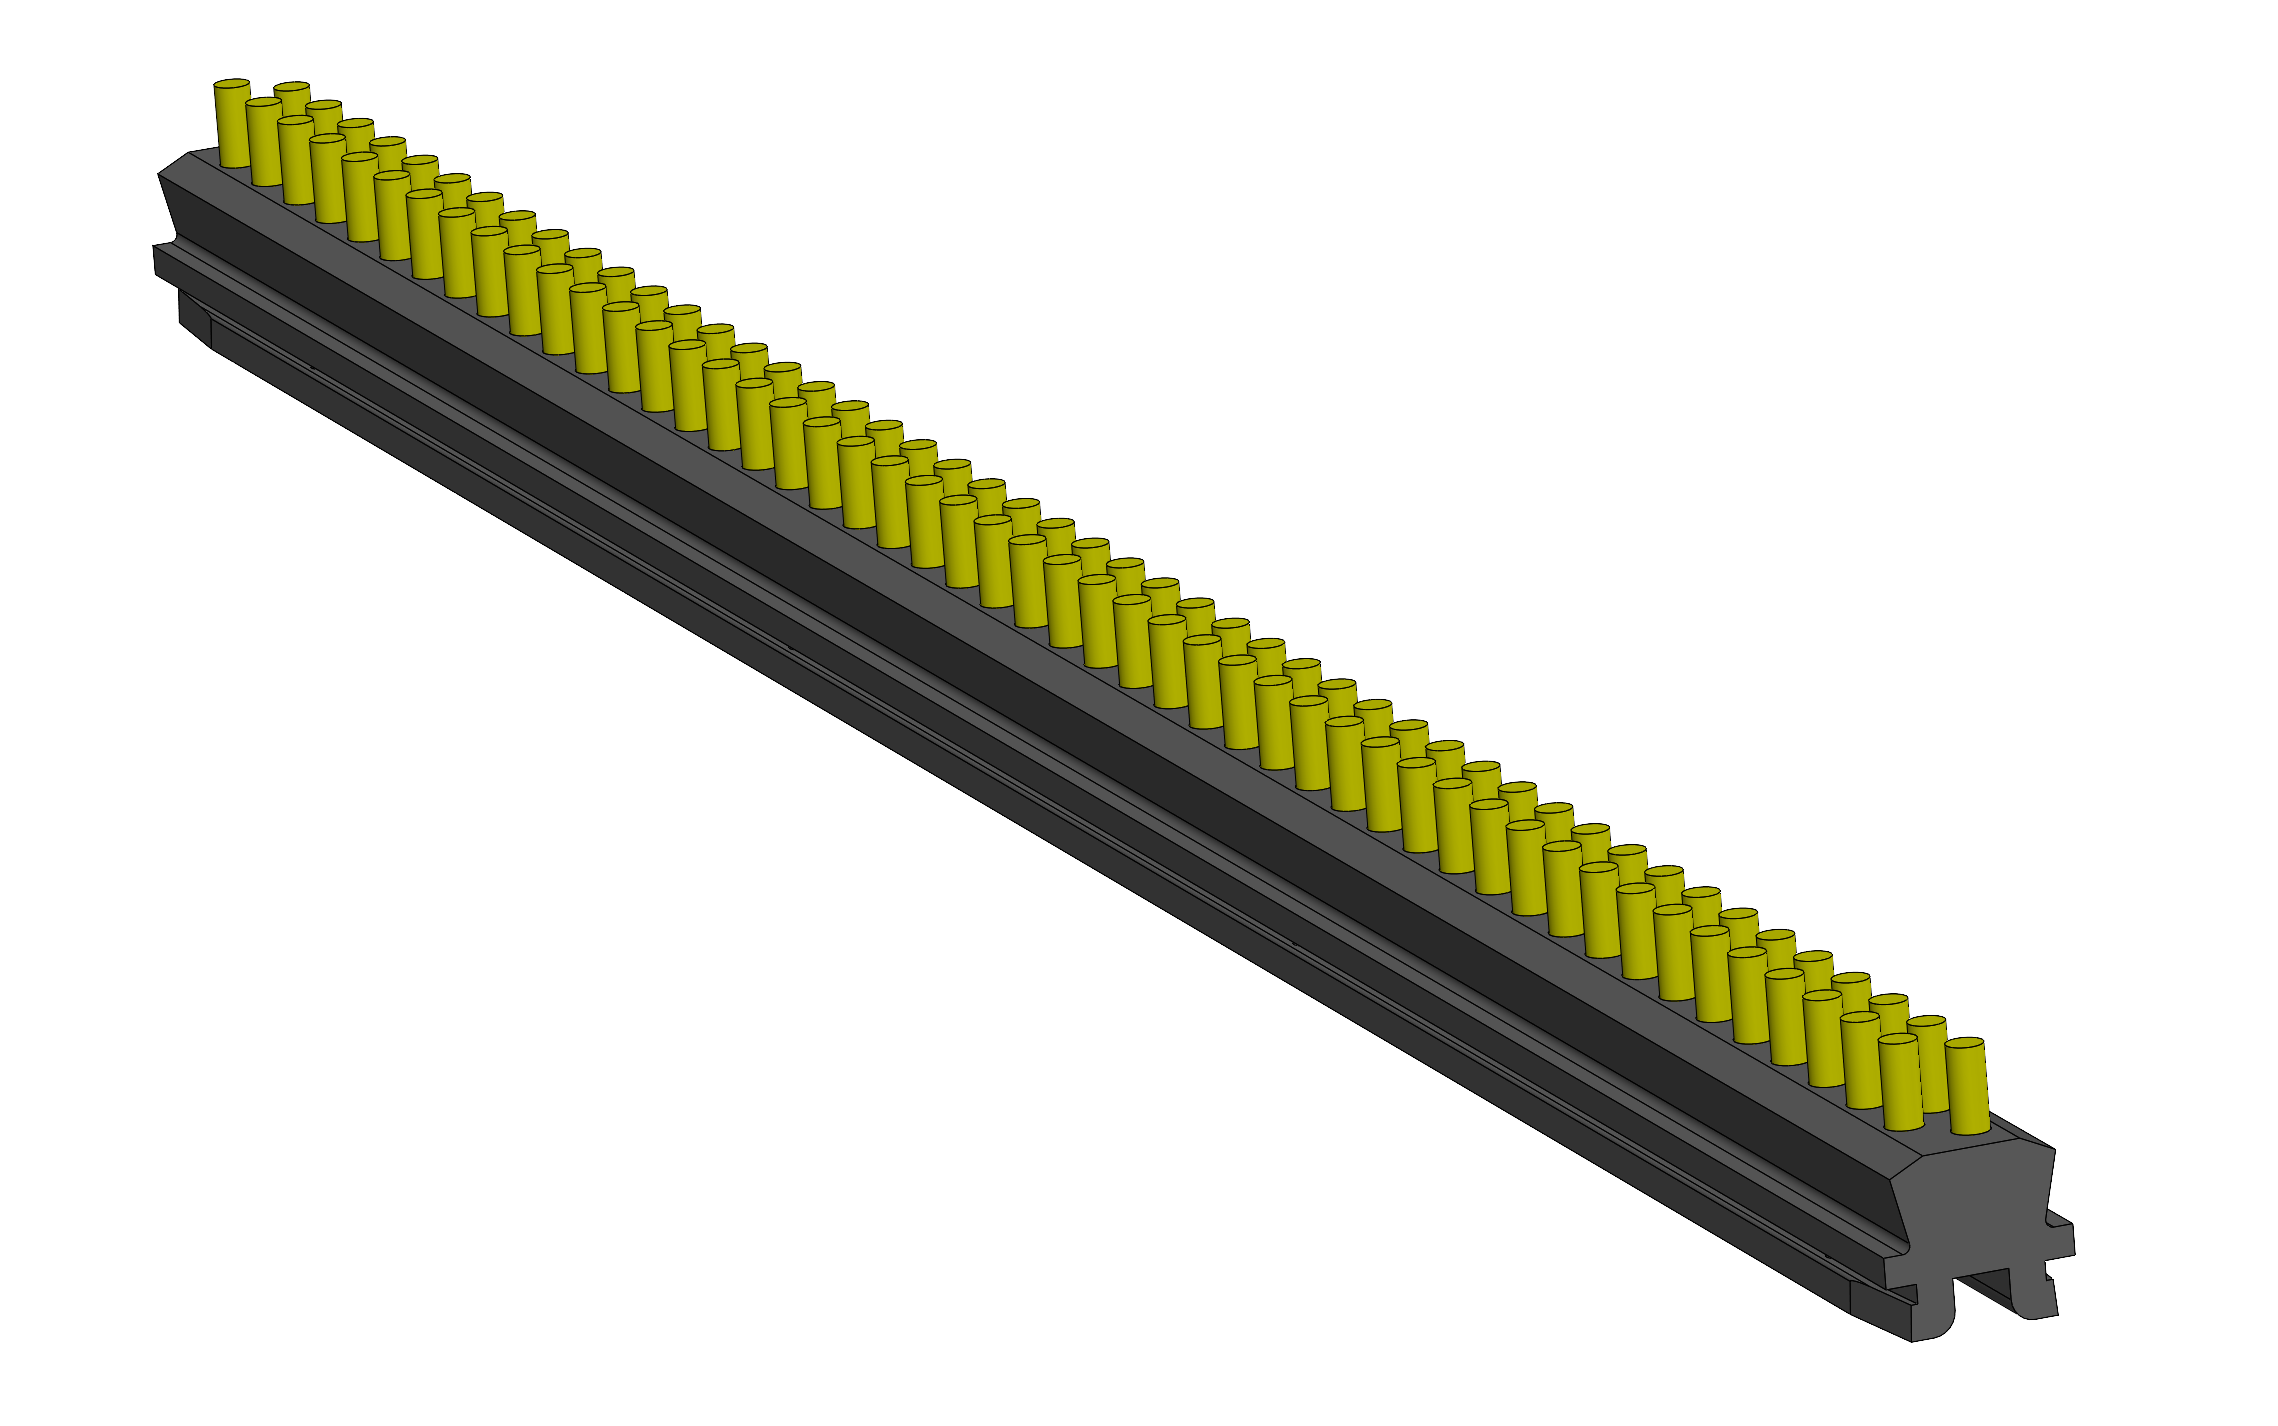 |
| Best for heavy slime/weed. Good choice for uncleaned hull. | Best for soft advanced fouling (e.g., green grass). Pair with a Black Brush in front. Higher drag—monitor winch load. |
| Barnacle Rollers | |
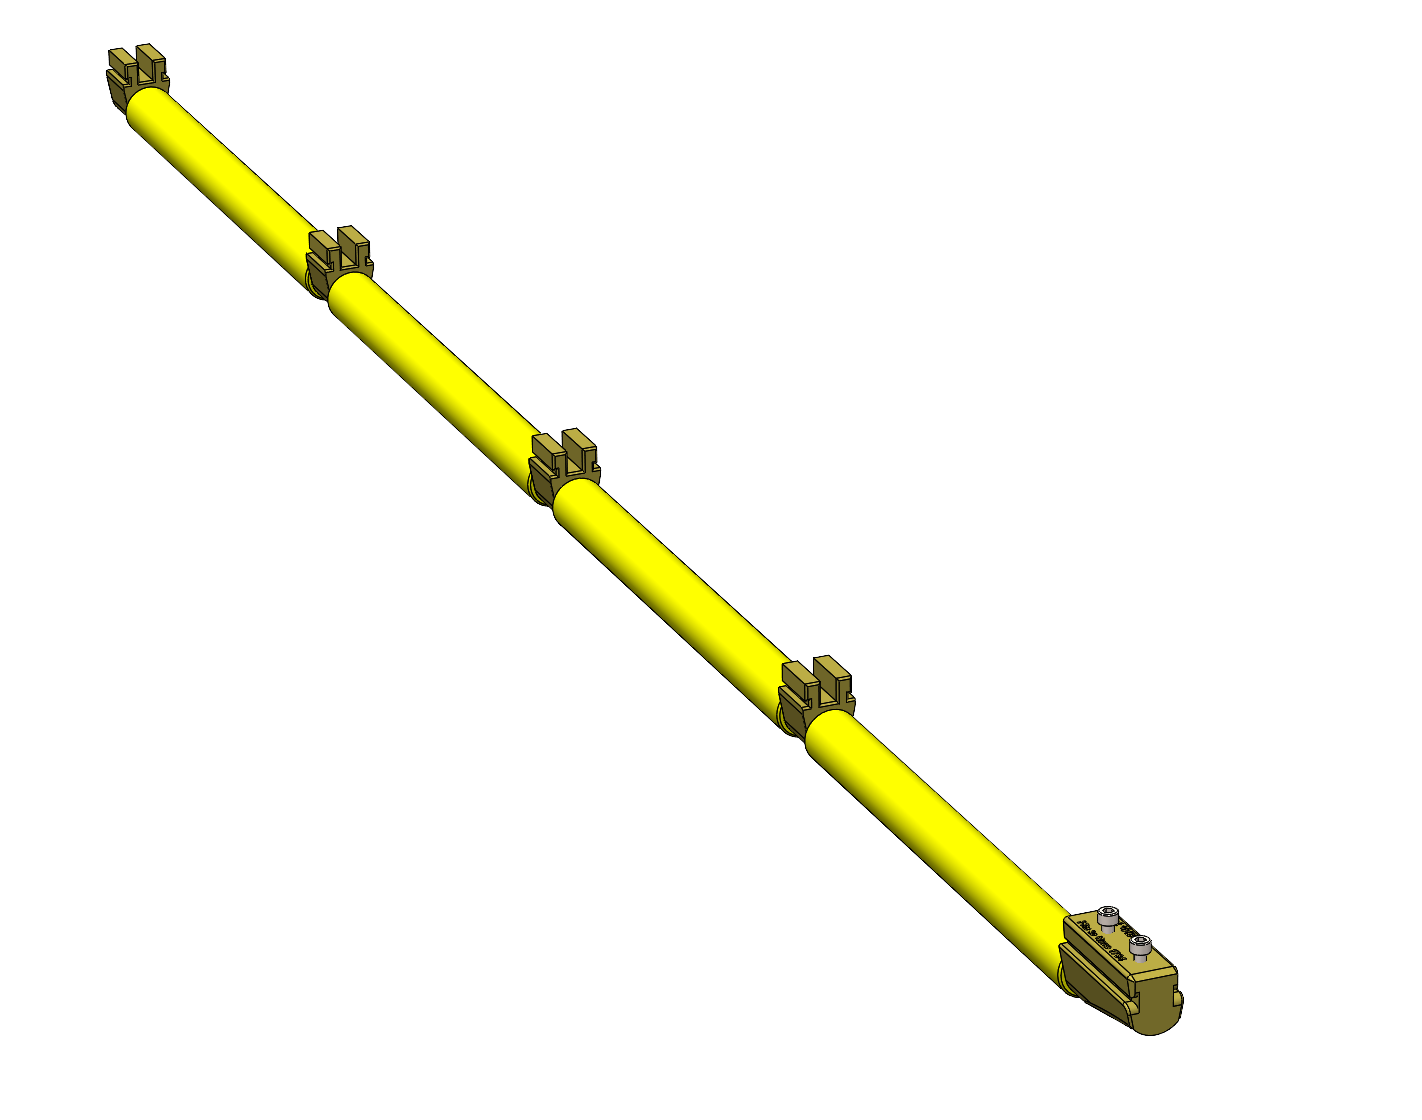 | |
| For barnacles/calcareous growth. Clean the hull with Blue Brushes to clear organics after usage. |
Outrigger Setup
Outrigger Selection
If multiple outriggers are available:
- Draft shallower than 11 m: use Neutral Outrigger.
- Draft between 11 m and 15 m: use Medium Outrigger.
- Draft deeper than 15 m: use Maximum Outrigger.
Options
| Neutral Outrigger | Medium Outrigger | Maximum Outrigger |
|---|---|---|
 |  |  |
Outrigger Mount Side
Video tutorial
Mount the outrigger on the same side as the hull side to be cleaned (port or starboard). Prefer the leeward side for smoother operation and steadier tracking.
Rope Setup
Rope Inspection
Before each deployment:
- Untie the bowline and pull the free end from the Rope Guard.
- Inspect the pulled section for damage.
- The rope has two layers: white outer (protection) over blue core (strength). If the blue core is visible or the outer layer is badly abraded, cut out the damaged section and tie a new bowline.
Video tutorial
Untie bowline and pull free end for inspection.

White protective braid over blue load-bearing core.
Rope Path Setup
Video tutorial
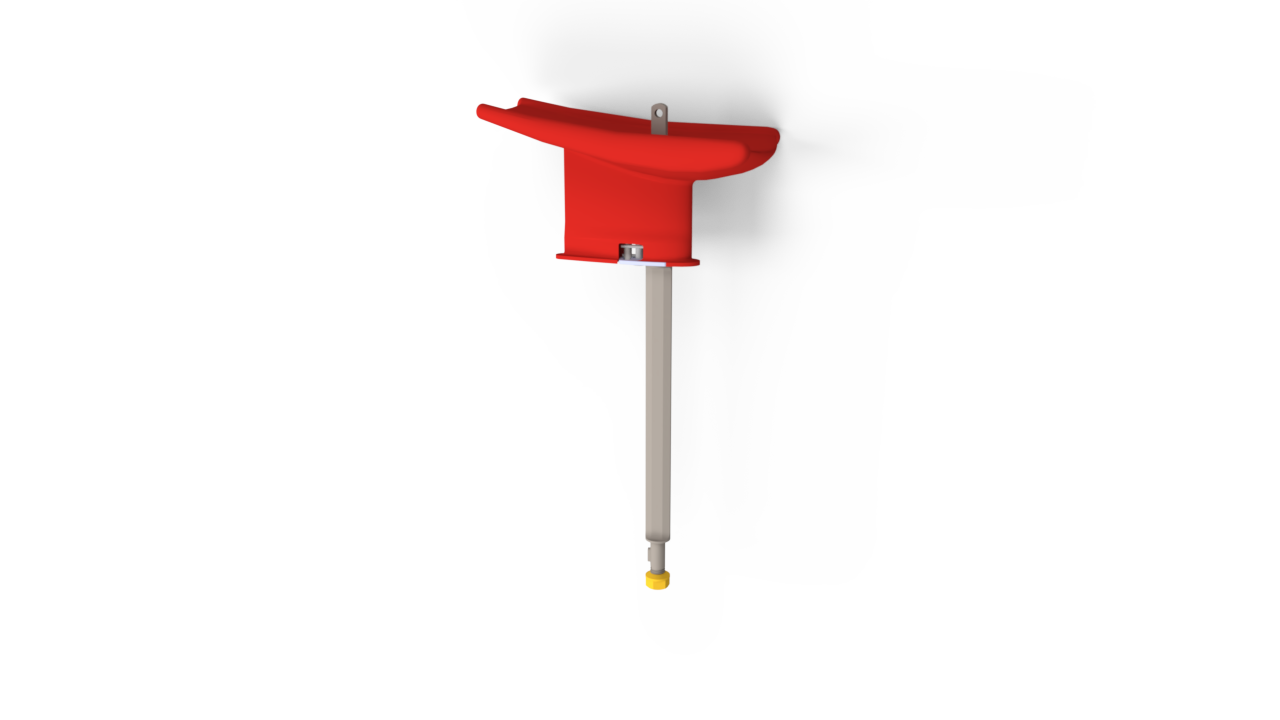
Use the supplied shive(s) (low-friction pulley) to minimize rope wear at the chock.
Install the shive (guide-line method)
- Position the shive in the chock. Rig a thin guide line through the chock and use it to suspend the shive so the wheel sits at the center of the opening. If the chock is too small for the robot, hang the shive just outboard of the deck edge.
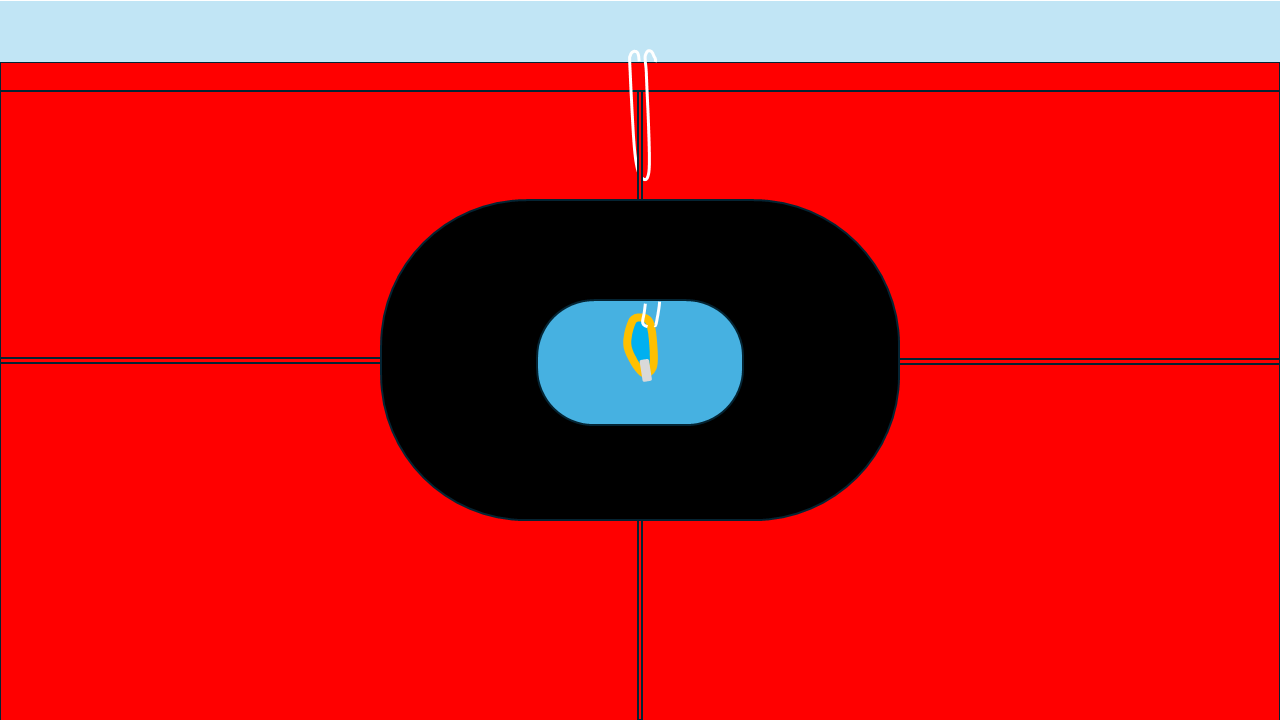
- Lead the working rope over the shive. Unspool from the winch and pass the rope over the wheel (not the cheeks). With small chocks, bring the free end above the bulwark before leading forward/aft.
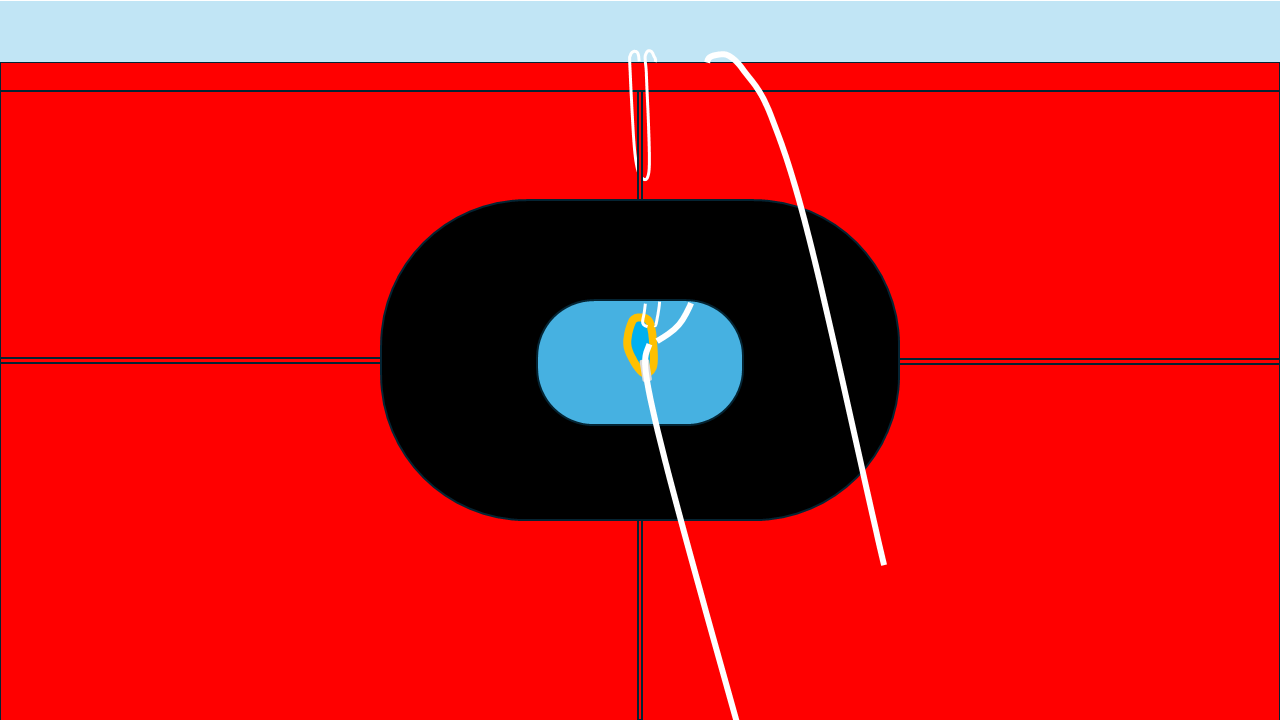
- Attach the Rope Guard. Connect the free end to the Rope Guard and tie a fresh bowline.
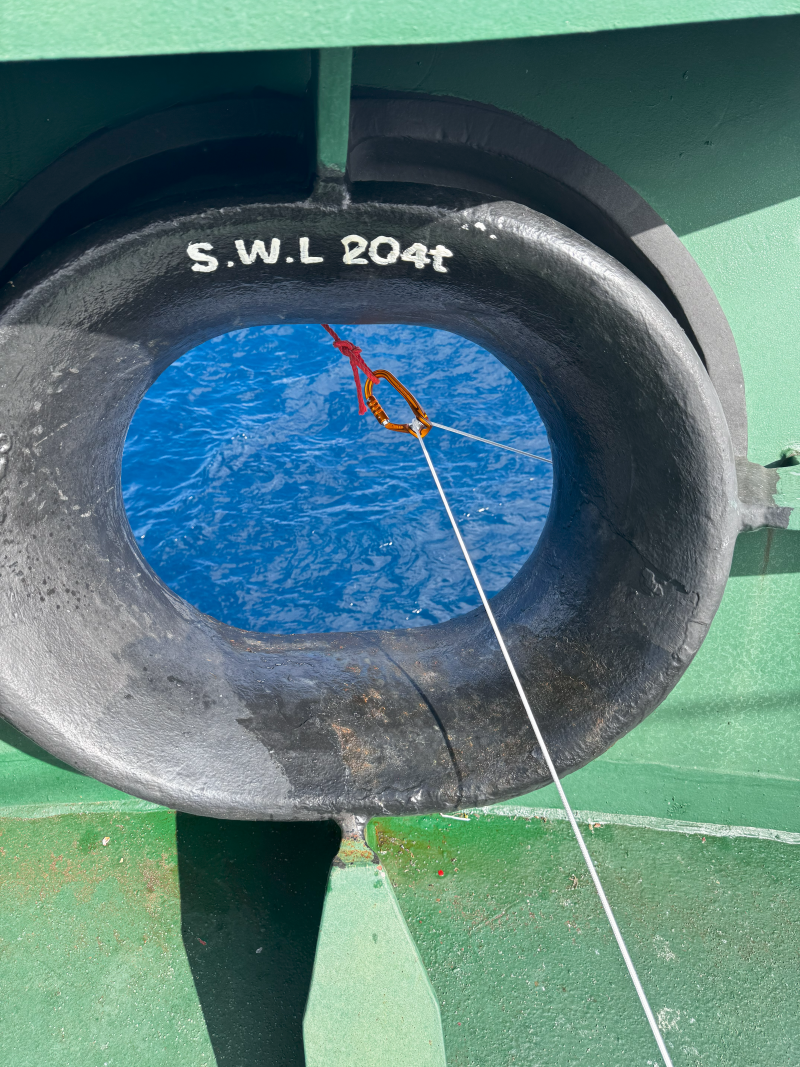
Final checks
- Rope does not touch the chock (rides only on the shive wheel).
- Shive rotates freely; no scraping/binding.
- Rope path is free of sharp edges or abrasive surfaces.
Cleaning Operations
Pre-cleaning setup
Video tutorial
Before cleaning, launch Slick and create a new operation.
- In the vessel page, click "Start operation"
- Enter the vessel details and the wave height. Slick will suggest the attachment parts suitable for the cleaning
- Equip the robot with suggested parts and complete the pre-checks
- Operation summary will be displayed
- If the robot has a sufficient battery level, you can upload the settings to the robot and the status light turns to solid green
Winch Setup
Before First Use
Video tutorial
To avoid the robot reaching parts of ship in the aft, such as a propeller or rudder, the rope must be cut to the right length.
- Set up the rope path referring to Rope Path Setup
- Spool the rope out and pull the end of the rope toward the aft of the ship
- Stop the winch when the rope runs out
- Cut the rope near the accommodation such that the rope end will not go further during cleanings
- Spool in the rope for the cleaning
Winch Rigging
Video tutorial
We recommend keeping at least 5 meters between the winch and the first place where the rope changes direction. This helps the rope wind evenly onto the drum.
Anchor the winch to a strong point (e.g., bollard) that can withstand a load of at least 1 ton.
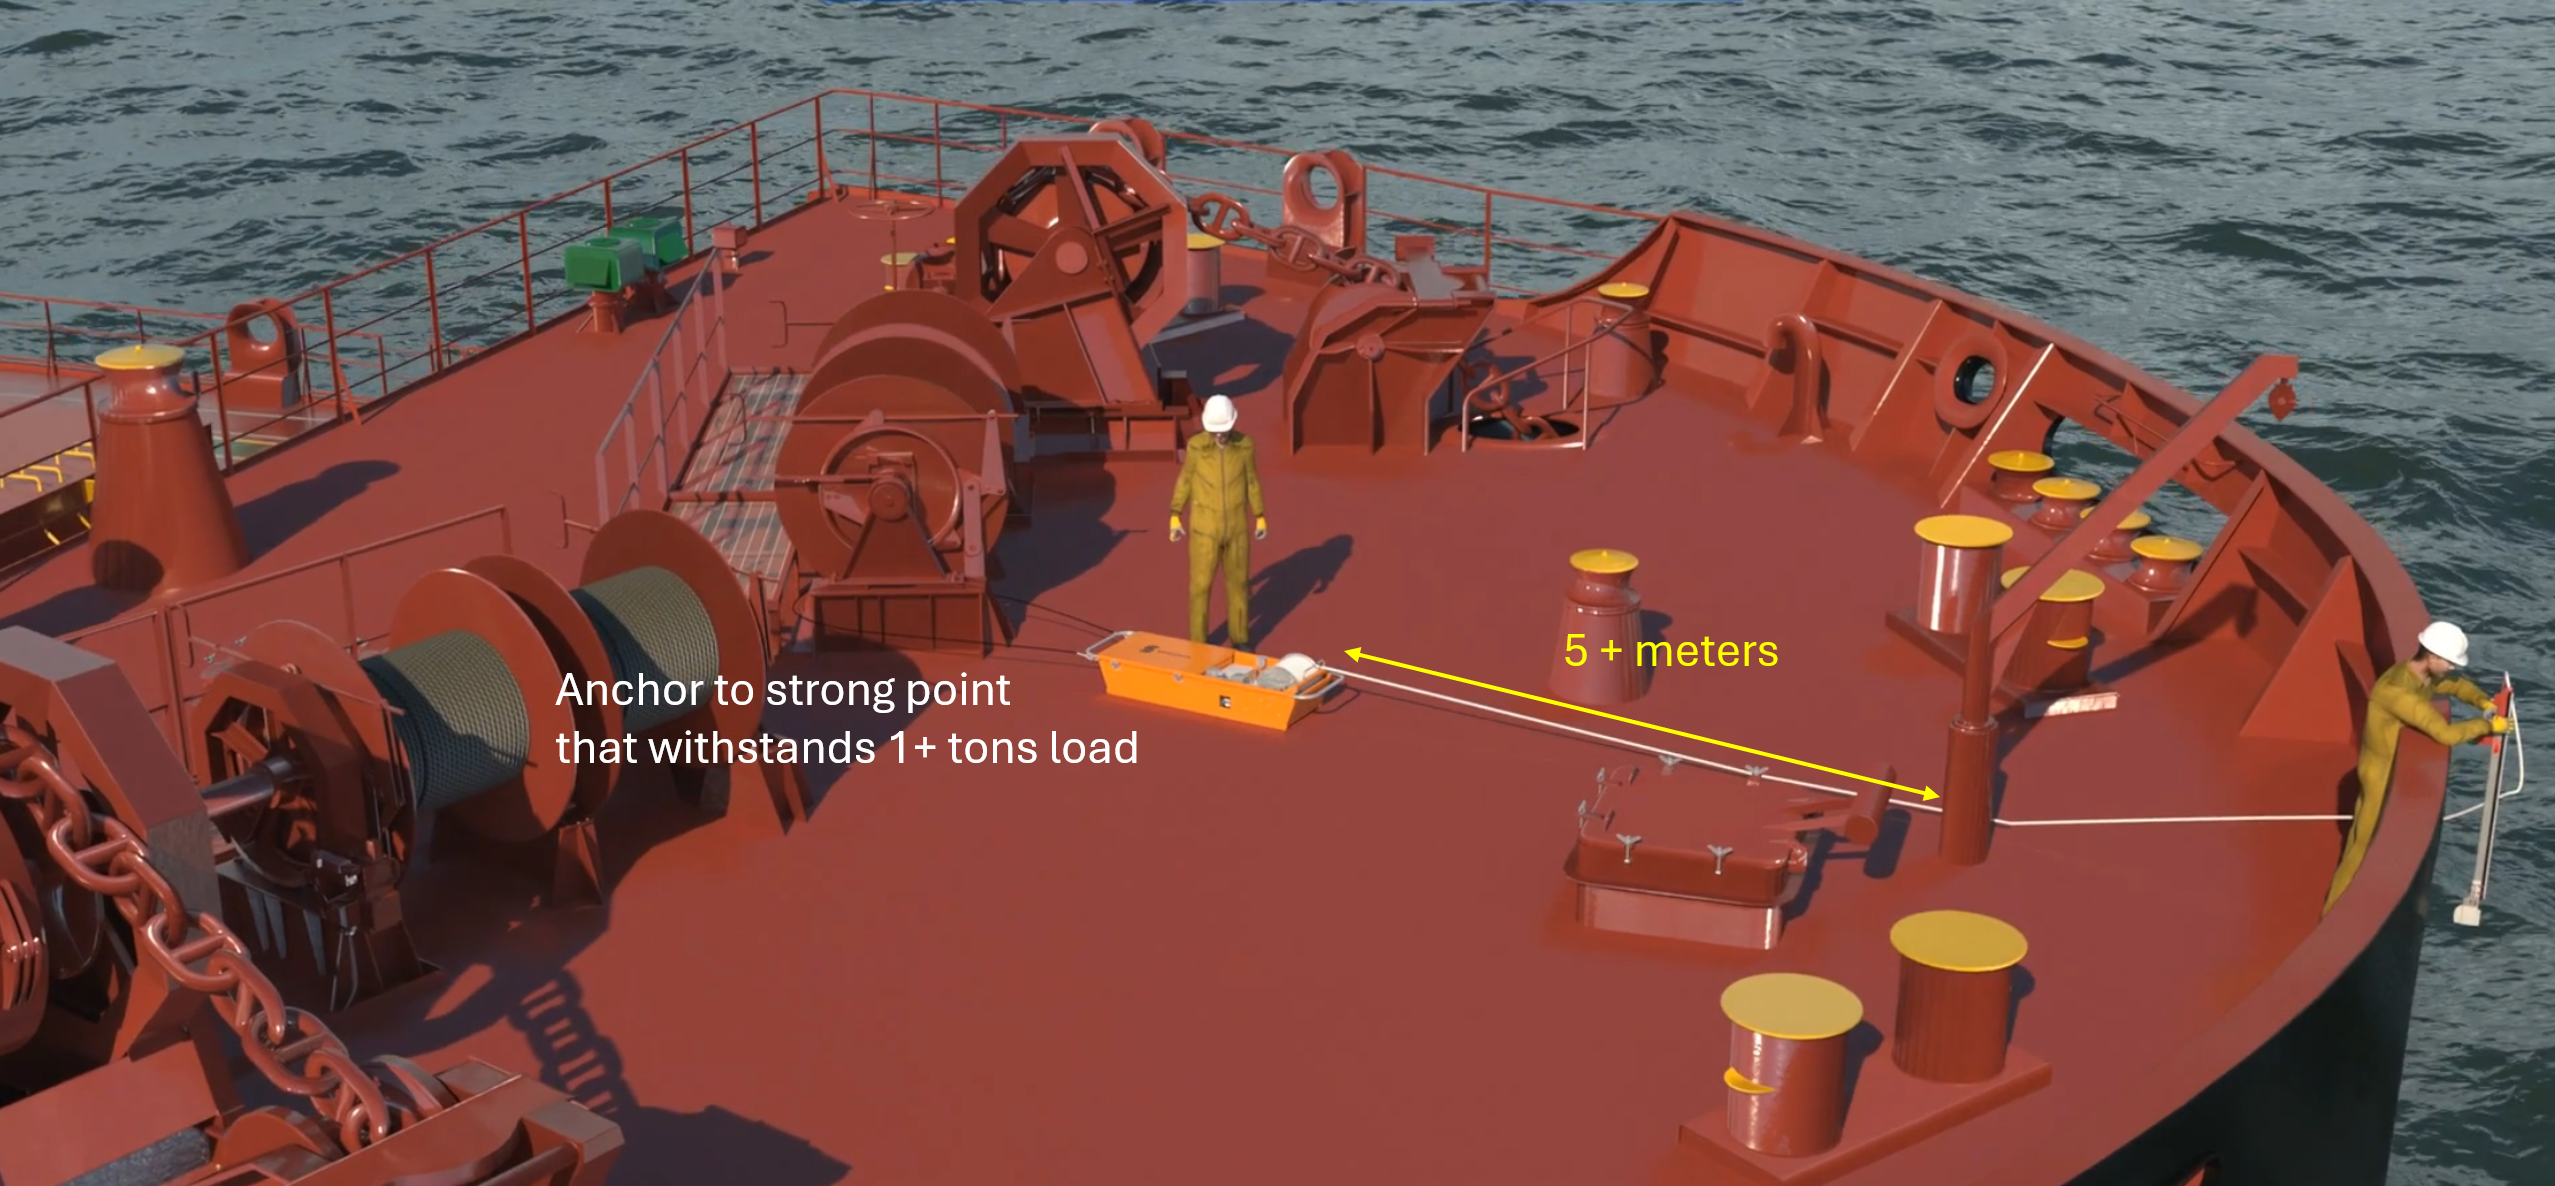
Deployment from the centerline chock is recommended for maximum coverage; other chocks are possible if required by anchors, bow thrusters, or local restrictions.
Deployment
Video tutorial
- Entry point: Let the robot enter the water near the bow stem and close to the hull. Ensure that the rope passes under the anchor.
- Winch speed: Spool out at high speed until the robot dives, then reduce to cleaning speed. Use the remote control (electric) or control panel (air) to tune speed.
Remote Control types
| Electric winch remote | Air winch panel |
|---|---|
| E-stop, lamp, direction, speed (L→R). | E-stop, speed, direction, barometer (L→R). |
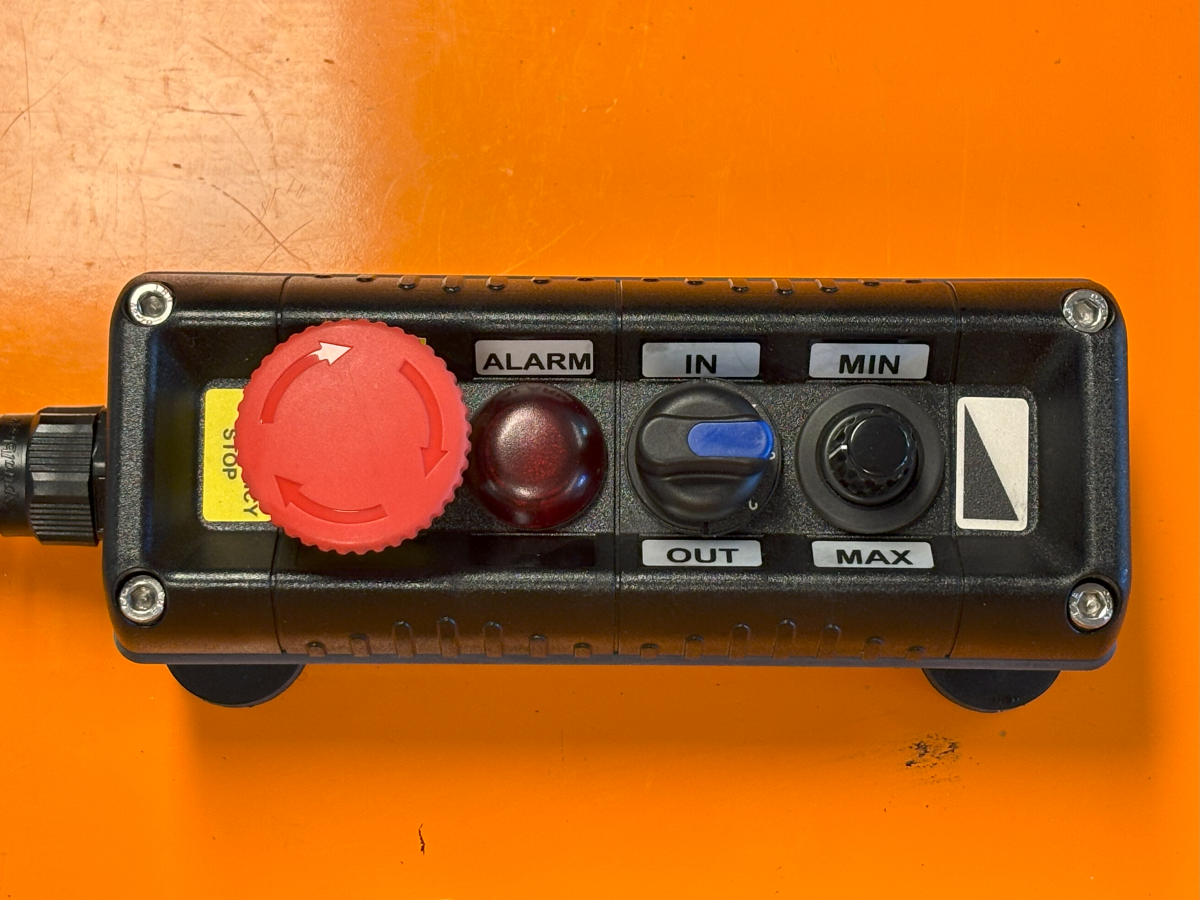 | 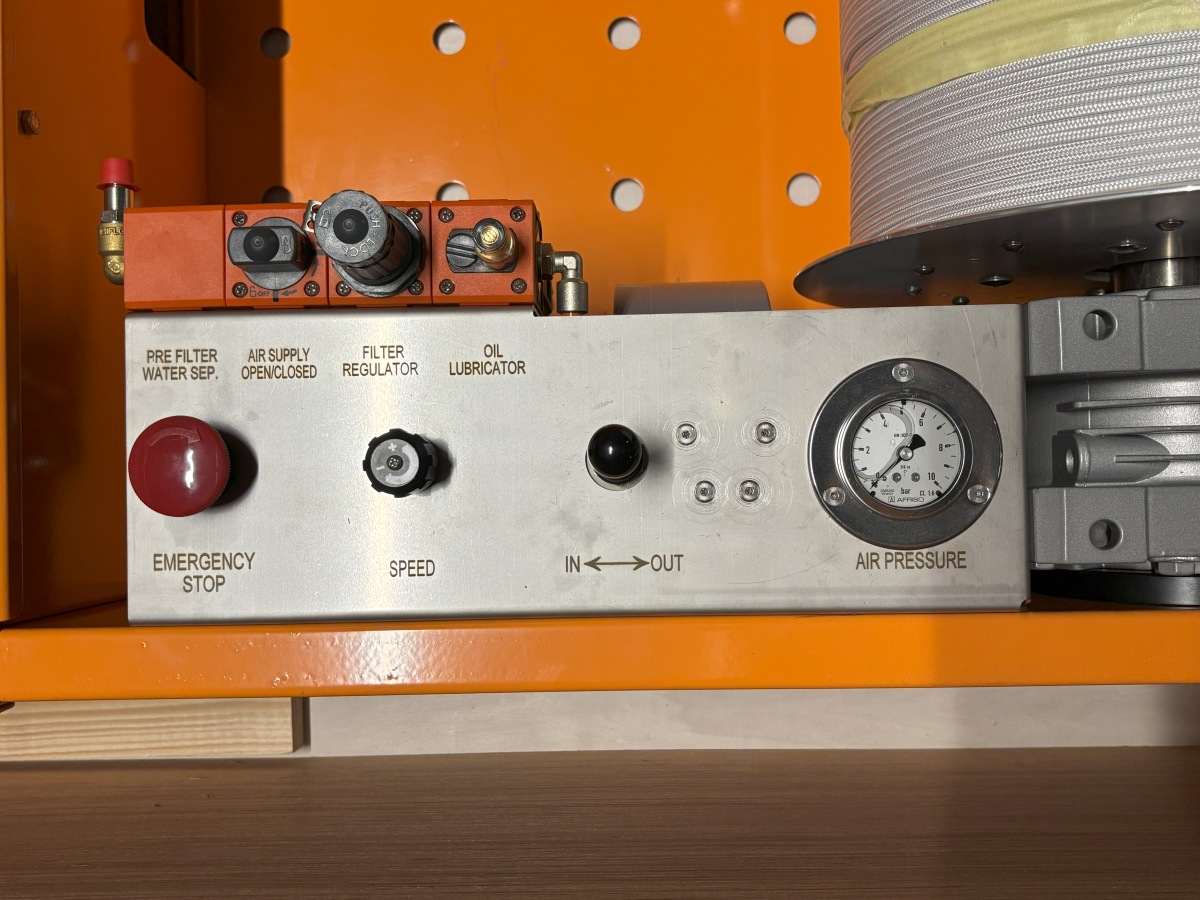 |
Monitoring During Cleaning
Video tutorial
*Monitoring
- Track rope tension; it should cycle high/low every 5–30 s.
- Reverse the direction when the rope runs out.
- Keep the rope neatly layered on the drum (avoid cross-overs/ridges).
- Check the behavior of the robot several times during an operation.
⚠️ Keep hands, feet, and loose clothing away from the rope, shive, and drum.
Troubleshooting during cleaning
When the winch stalls
-
Design behavior: stalls at ~180 kg; auto-restarts after unloading to ~140 kg.
-
If a stall lasts more than a minute (likely hang-up on structure such as a bilge keel):
- Unspool 5 m quickly.
- Spool in 7 m at maximum speed to dislodge.
- Resume normal winch speed.
-
If stalls persist:
- Reduce the vessel speed and spool in the rope
- Review the video after retrieval to identify the causes
Common causes of stalls are
- Too much friction between the hull and the brushes. Use Barnacle Rollers if the hull is covered by barnacles
- Too much downforce due to incorrect choice of outrigger. See this section to select the right outrigger
- review the video after cleaning and adjust the tool selection — use Barnacle Rollers for barnacles or Black Brushes for soft fouling.
When the the robot surfaces for more than a minute or it departs from hull many times
- Start spooling in the rope if the winch is unspooling
- Check if the parts are intact
- Review the video after retrieval to identify the causes
Retrieval
Video tutorial
- When the robot returns to the foreship, spool in at maximum speed, then stop and retrieve through the chock.
- Wait for the status light to stop blinking blue and go solid purple before power-off (can take up to ~1 hour).
- Connect the robot to the Slick Application to download cleaning data.
Maintenance
Video tutorial
Robot
- Disassemble and inspect components; order spares as needed.
- Store parts in the winch compartment.
- Flush with fresh water.
- Lightly oil winch surfaces (e.g., WD-40/CRC 565).
Winch
- Inspect winch & rope for wear.
- Flush with fresh water.
- Air winch: Refill lubricator, empty air dryer, wipe off oil.
Appendix
Status Light and Mode of Robot
The status light shows the robot’s current mode.
Start-up — blinking green (10 Hz)
After power-on the light blinks green, the rudder moves and then switches to Mission Planning (or Dive Standby if a mission is stored).

Mission Planning — blinking purple (1 Hz)
Plan the next mission using Slick. Do NOT start cleaning in this mode.

Dive Standby — solid green
Robot is ready to dive. If idle for 30 min, it powers off.

Processing — blinking blue (10 Hz)
After retrieval, data transfers to onboard storage. When it changes to blinking purple, connect to Slick.
Charging — blinking yellow (1 Hz)
Fully charged — solid yellow

Update mode — solid blue
Hold the power button ~5 s, then connect to Slick.

Low Battery — blinking red (1 Hz)

Error mode — solid red
Indicates the robot had an error and unable to operate. Reboot the robot.
If it persists, contact support@shipshave.no.
